My Backpacking Gear
A comprehensive and continuously updated backpacking gear list with extensive recommendations, reviews, and backcountry tips, including premium and budget gear picks for tents, backpacks, sleeping bags, and much more.
- Last updated in September 2025 with new tent and headlamp recommendations.
- Many of the product links are affiliate links, which means that if you purchase something after clicking one of my gear links, I will get a small commission and it won’t cost you anything more.

Mountains goats check out our tent and campsite in the Weminuche Wilderness, Colorado.
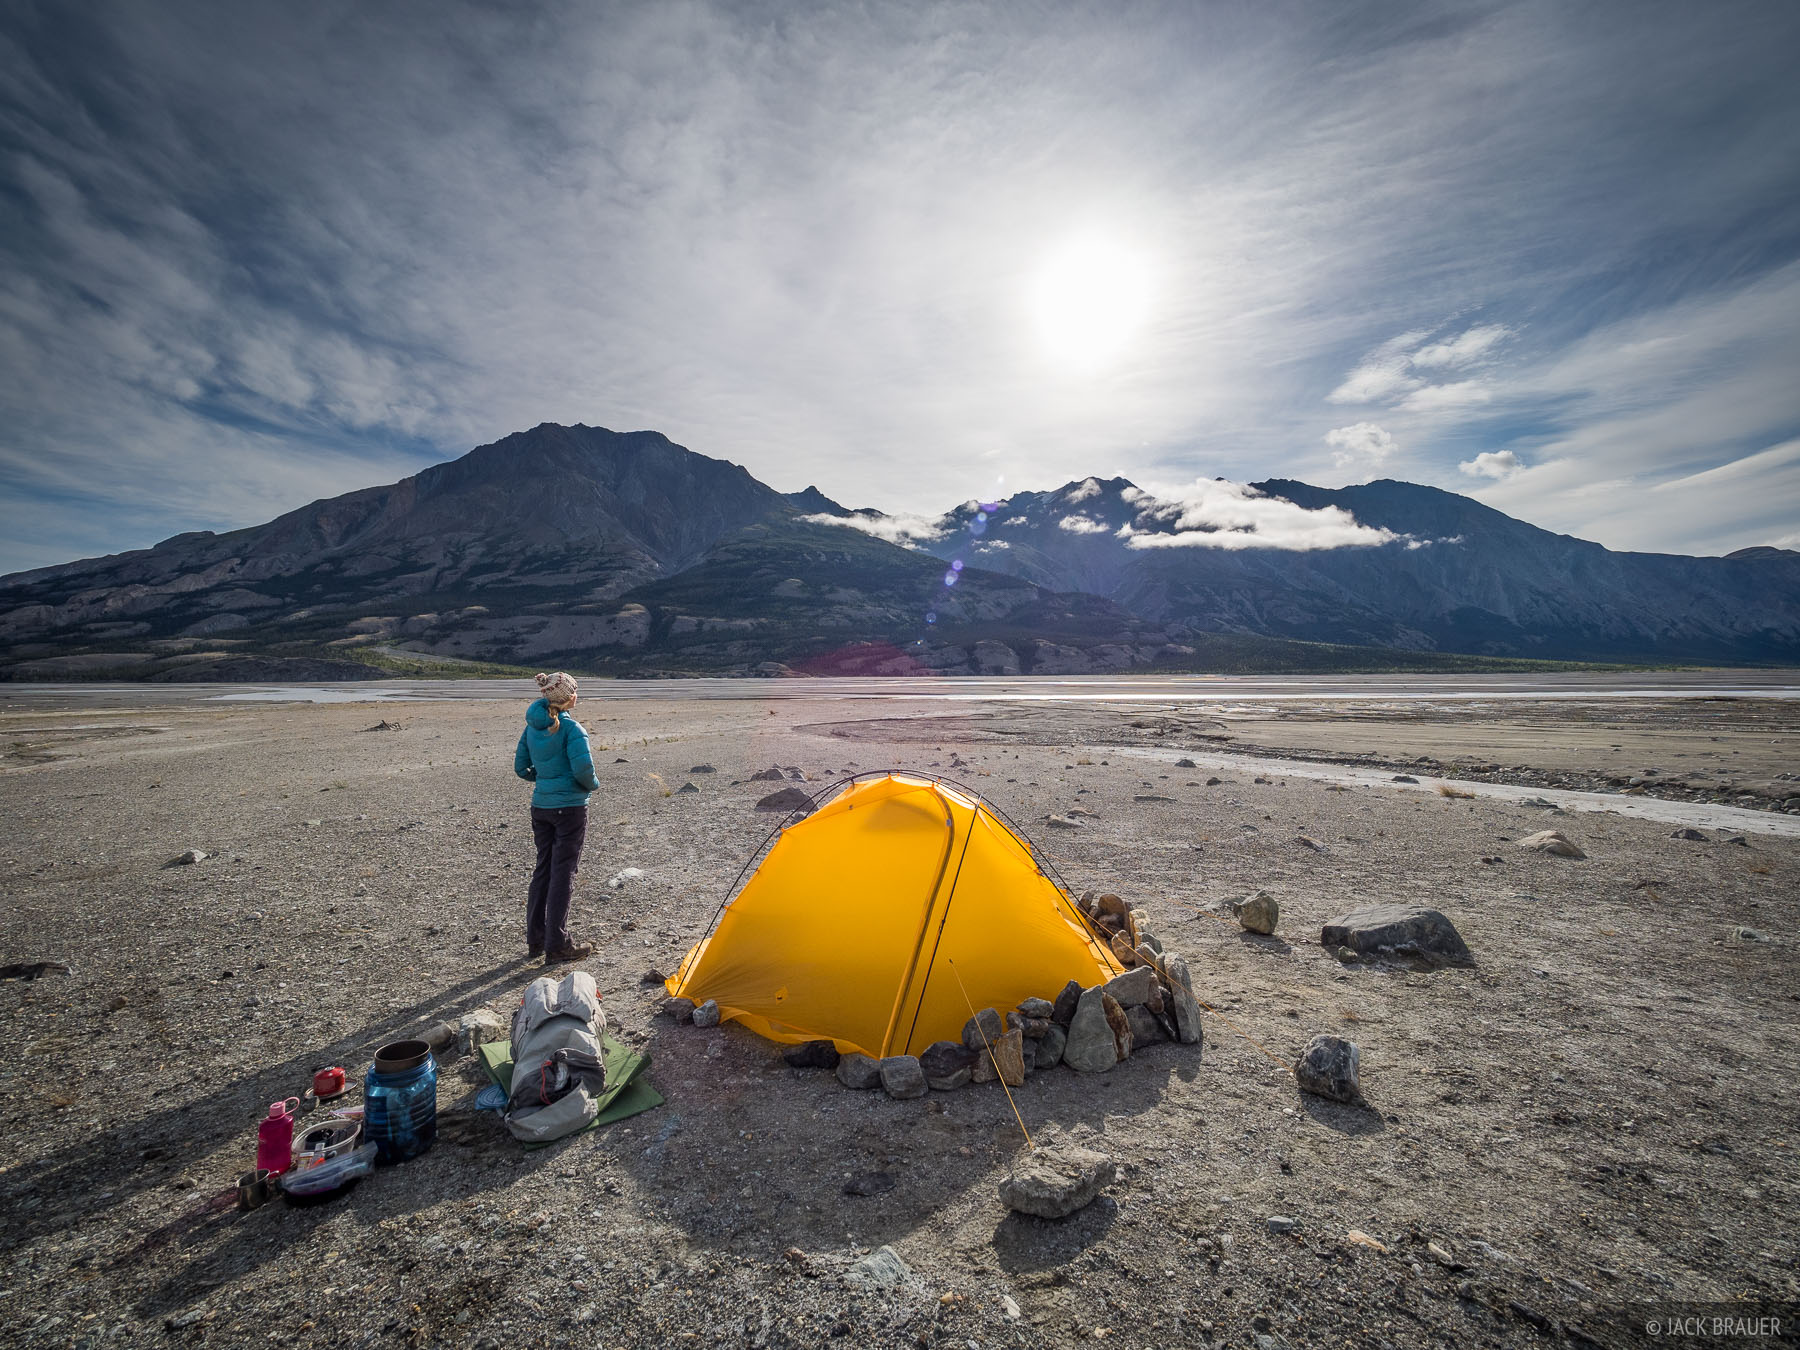
Backpacking into the mountains is a great joy of mine. It feels adventurous and liberating to venture into the wilderness with everything you need to survive (and even stay comfortable) on your back. By backpacking you have the means to “live” – albeit briefly – in paradisiacal locations that boggle the mind and soothe the soul. But, first you need to have the gear to do it.
As Terence McKenna observed, humans are probably better categorized as crustaceans, since we basically live our lives moving from one shell to another, whether it’s a house, car, office, or a tent. Which is to say, we can’t just wander off naked into the woods and expect to be one with nature! Fortunately for the modern adventurous crustacean we have an almost endless array of high tech, lightweight clothes, sleeping bags, shelters, and tools to keep us alive and happy while walking in the wilderness.
Recently I’ve received a bunch of emails asking me about my backpacking gear. I realize that it can be a bit daunting for someone who is interested – but not experienced – in backpacking to figure out what equipment they need to bring into the mountains for an overnight or multi-day camping trip. You need to travel light, but you also need all the stuff to keep you warm and dry. In this post, I’m going to list and explain all the gear that I use on backpacking treks. I will also include some helpful tips along the way.
The gear I’m listing below is based around backpacking in the mountains of Colorado. In the summer here we have warm days, frequent thunderstorms with rain, and chilly nights. In the winter it’s often sunny but also it can be windy and bitterly cold. The consistent variety of Colorado’s weather means that the gear I use here will be similarly suitable for many of the world’s mountains.
My strategy for backpacking involves striking a balance between lightweight travel and basic comforts. While I’ll never qualify as a true ultralight backpacker due to my camera gear, I do believe that opting for ultralight gear whenever possible can dramatically reduce your pack weight, allowing for more enjoyable hiking that’s easier on your body. In my gear list below you will see that weight is often a main priority.
Because I backpack so often and because backpacking is an integral part of my photography business, I am willing to spend extra money on expensive, premium, ultralight gear – for me this makes sense and is worth it. I often spend hours researching gear, scouring reviews and forums to discover niche products and to get a sense of the best ultralight gear options. Part of my intention with this article is to share my knowledge and experience of the very best backpacking gear available, and thus you will see that my gear list below is definitely aimed at the premium end of the spectrum. I realize that the excessive cost of some of this ultralight gear is beyond reasonable for casual or beginner backpackers, but at the least my recommendations can serve as a reference point to compare other products to. Keep in mind that there are many great products on the market beyond the ones I list here, many of which are far less expensive and perfectly adequate for backcountry comfort and performance. You don’t need specialized gear for everything; of course people have been hiking, camping, and enjoying the wilderness for many generations before any of this high tech gear existed!
My Current List of Backpacking Gear
Let's dive right into it. Here's my current updated LighterPack spreadsheet of gear for a typical 1-2 night solo early/late summer backpack trip when I may expect warm days and chilly nights. This includes everything but food and water. Of course this list varies a bit for each trip depending on the place, time of year, and what different or extra gear I bring.
* In some cases I may bring more or heavier lenses, which adds weight. Either way, what stands out to me in the graph above is what a huge portion of my total pack weight is the camera gear - roughly a quarter to a third of the weight of everything (depending on the lenses taken)!
** Most of the time I backpack with my wife, which lightens things up a bit more since we can split up the shared gear between us.
Read on for lots more explanation, recommendations, and tips!
My Summer Backpacking Setup
I'll start with the biggest tip right away: if you are a backpacker interested in lightening your load, the quickest way to shed the pounds is by upgrading the "Big Three": tent, sleeping bag, and backpack. Upgrading from traditional to ultralight gear for each of these items could potentially shave upwards of 4-5 pounds from your kit, for a noticeably lighter pack on the trail. (Though your wallet will be noticeably lighter too).
Tent
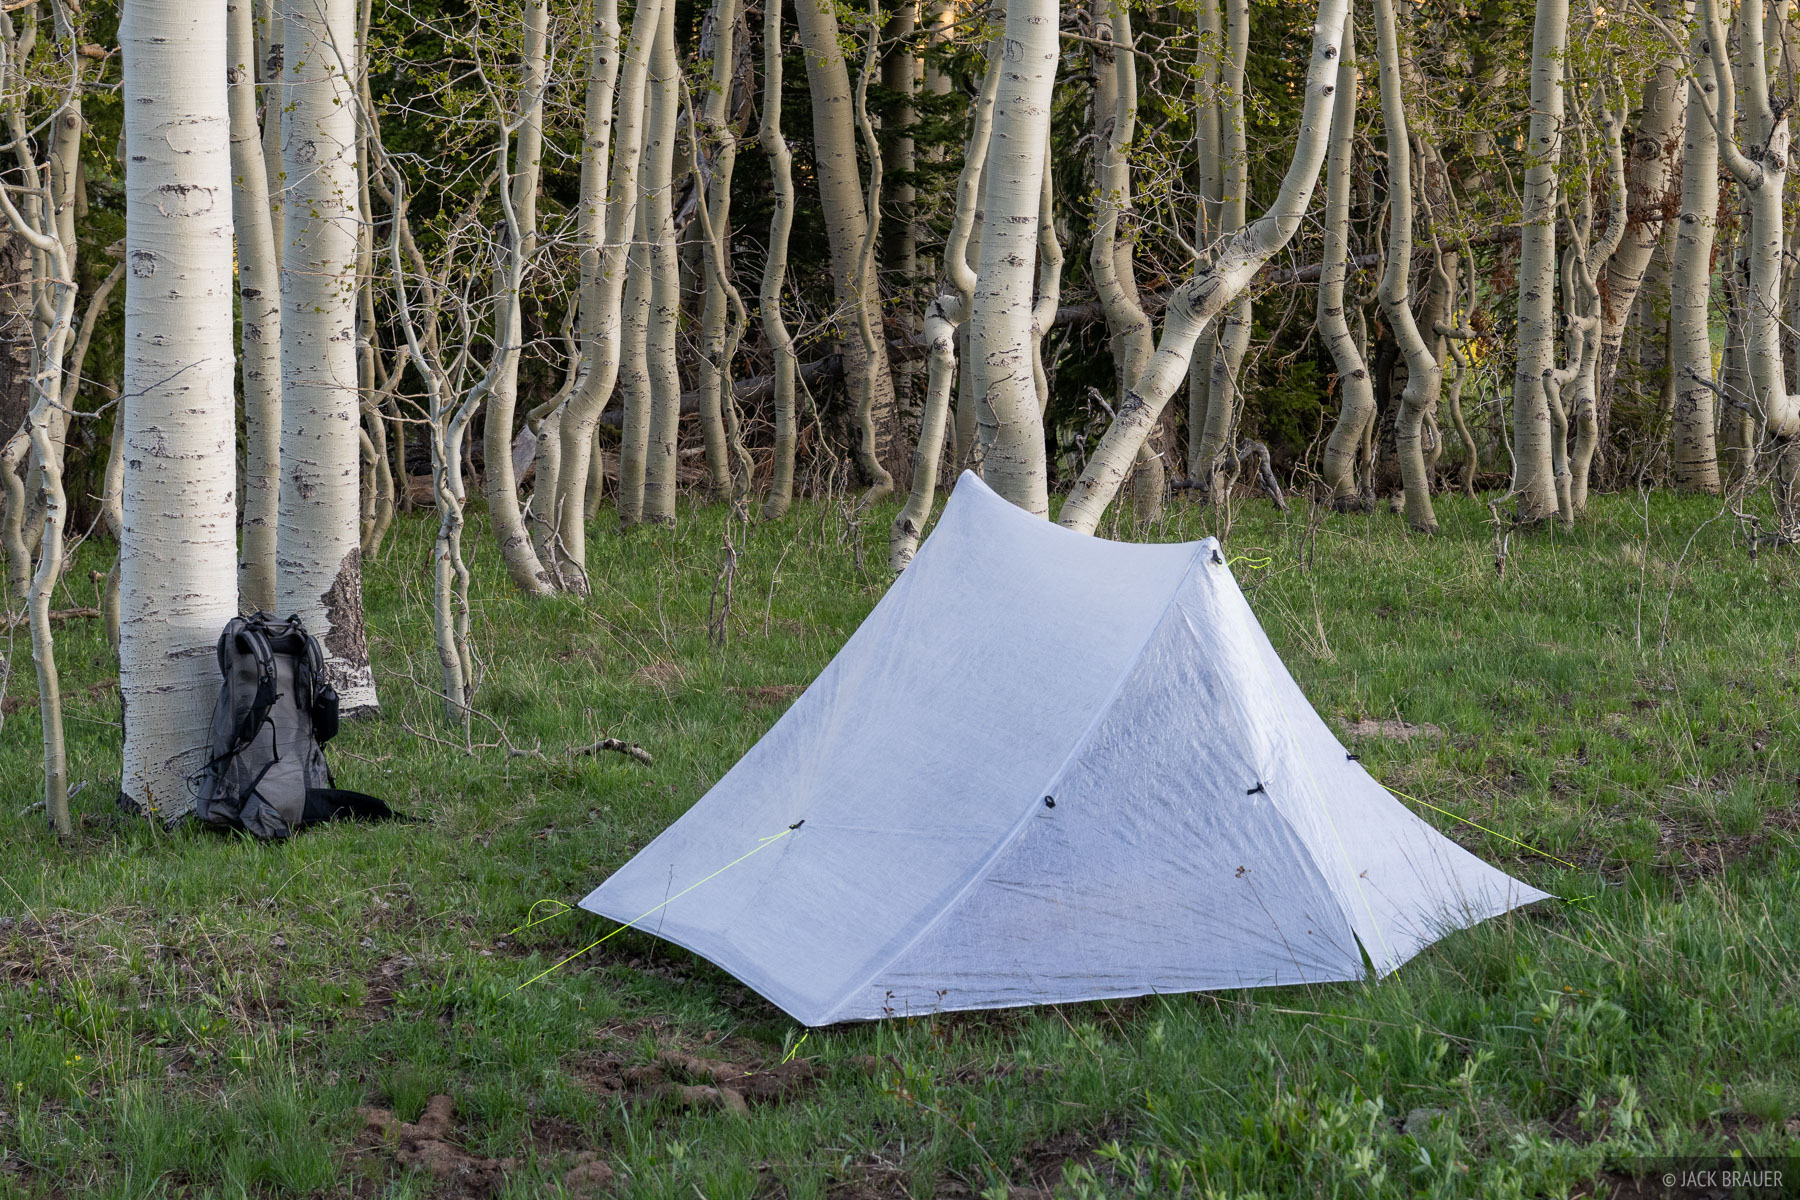
In my opinion a fully enclosed mosquito-proof tent is the way to go (rather than floorless tents or tarps). I appreciate having a sanctuary space protected from bugs and other critters, where I can throw all my gear into at camp and not worry about it getting wet or dirty.
For ultralight tents, the best options are single-wall, trekking-pole-supported tents made out of Dyneema Composite Fabric (DCF). This material is ultra lightweight, ultra strong, and totally waterproof (so it remains completely taut in the rain, and you can shake the water off and won't ever have to pack a soaking wet tent) - but, it's also ultra expensive. DCF tents can be nearly half the weight of a comparably-sized nylon tent, though, so if you do a lot of backpacking the astronomical prices are worth it to save so much weight.
If you hike with trekking poles it's kind of a no-brainer to use a trekking-pole-supported tent, which saves unnecessary weight since you don't have to carry extra tent poles. The Zpacks Duplex (19.6 oz with 6 stakes, $699) is THE classic ultralight, single-wall, trekking-pole-supported DCF tent that all others can be compared to. We used one for four years and it served us well. But nowadays there are better options.
Although I haven't used one myself, if I were to buy a new ultralight 2-person tent it would most likely be the Zpacks Pivot Duo (20.8 oz with 8 stakes, $849 😳). It's similar to the Duplex but with a lot more headroom. Sufficient space for two people, but also light enough to use as a palace solo tent.
If you don't hike with trekking poles or if you often camp on hard surfaces like granite or sandstone where it's difficult to stake out a trekking-pole-supported tent, then a freestanding tent would be preferable. The "Rolls-Royce" of freestanding tents would be the Zpacks Free Zip 3P (36.2 oz + 6 ultralight stakes). This tent is simple to set up and offers an ample amount of interior space and headroom for 2 people while also having a much more compact footprint area compared to many other 3P tents. (I prefer tents like this that maximize interior space and minimize vestibule and footprint space). It is also rock-solid stable in high winds without even any flapping to keep you awake. However, at an eye-watering $999, you might need to sell a kidney to afford this one, or at least wait for possible 10% Black Friday sales.
A smaller, lighter but almost equally expensive semi-freestanding 2P tent option would be the Tarptent Double Rainbow Li (27 oz with stakes, $879). This tent has been on the market for long enough that you may be able to find a used one for a good price.
Both Tarptent and Zpacks (and many other cottage tent brands) also make a variety of ultralight 1-person tents. There are many good options in this category but I'd say the most compelling overall is the Zpacks Duplex Lite (18.45 oz with stakes, $669), an oversized 1+ person tent that has room to spread out a bit but still weighs less than most solo tents. Most ultralight 1-person tents are "mid" designs, a variation of the pyramid architecture with a single offset trekking pole support; but this design inevitably leads to a low angled sidewall and cramped headspace. The Duplex design uses two trekking poles (which I'm carrying anyways) offering vastly more interior space, as well as two side doors/windows versus only one door with the mids. This provides better ventilation and views on warmer nights.

Another noteworthy solo tent is the Tarptent Moment DW Li (28.6 oz with stakes, $679); its double-wall architecture, crossing pole, and solid inner option make it suitable for 4-season use and inclement weather. It's more versatile, more stable, and easier to set up (requiring only 2 stakes for a sturdy pitch); however it is a bit heavier and its built-in struts make it much less compact to pack.
* When comparing weights of these ultralight, ultra-expensive tents, be sure to include the weight of necessary stakes and guylines. Some companies like TarpTent include this in their listed tent weights, while some like Zpacks don't include them (sneaky!).
Budget options: Most inexpensive tents come with a significant weight penalty of several additional pounds or more, which I don't recommend at all. But if the prices of those ultralight DCF tents above seem absurd to you, don't worry, there are still some decent lightweight options! There are numerous reasonably-priced 1p and 2p options that Tarptent offers in their non-dyneema fabrics in the $300 and 1.5-2 lb range; the one I'd probably pick for a solo tent would be the Notch (28 oz, $259); or for a 2p tent the Double Rainbow (38 oz, $299).
Another option for a budget lightweight tent would be to use an inexpensive "normal" freestanding tent that has a fly-only pitch option, then leave the inner tent behind.
Tip: If you need extra guyline, it's hard to beat Lawson Glowire (2mm).
Sleeping Bag
Down sleeping bags are lighter, more packable, and warmer than synthetic sleeping bags. For typical alpine summer/autumn nights I prefer a 20ºF rated down bag. (Keep in mind that sleeping bag temperature ratings are usually not comfort ratings but rather the lowest estimated temp you can use the bag without completely freezing your butt off). If you are a warm sleeper and/or focused on the summer months, a 30º rated bag should be fine for less cost and weight, though you might get pretty chilly on cold autumn nights.
For backpacking couples like us, double sleeping bag systems are superior because you gain a lot of extra heat by sharing the space with your partner (just be careful with those curry or bean chili dinners!). We use a Feathered Friends Spoonbill double bag, which is very warm (I estimate about a 15-20ºF temp rating) and weighs an incredible 2 lb 8 oz., just slightly heavier than most single person sleeping bags! It achieves this light weight because the down fill is only on the top and sides, not on the bottom which is unnecessary since down is squished and ineffective anyways when you're laying on it. Although there's nothing else quite like it on the market, unfortunately this sleeping bag has gotten crazy expensive in recent years and now has an eye-popping $1000 price tag!
Budget options: The Big Agnes King Solomon 20º (4 lb, $450) is a doublewide bag at half the price, but much heavier than the Spoonbill.

For solo summer trips I use a customized Cumulus X-Lite 300 sleeping bag (25ºF limit rated, 19.6 oz, $420. The base price of the standard non-customized X-Lite 300 is a very reasonable $325). Made in Poland with high quality 900-fill-power goose down, these bags are an exceptional value and some of the lightest weight on the market for their warmth, plus you can customize the sizing, fill, and colors as you desire! I added 50g extra down fill and 10cm girth to mine for a little more warmth and space to move around inside. A 25º bag with hood and zipper at just 19.6 oz is pretty astounding. My only complaint is that the zipper snags easily on the fabric, so care must always be taken when zipping/unzipping. Cumulus also makes a wide range of ultralight sleeping bags for other temperatures too.
Another highly regarded sleeping bag company worth considering is Feathered Friends out of Seattle. Their Swallow UL (20ºF, 27 oz, $629) or Egret UL (20ºF, 25.6 oz, $589, for women) are both great all-rounder 3-season sleeping bags. These are a bit heavier and much more expensive than the Cumulus bags mentioned above, but the Feathered Friends are more durable and definitely have a far superior no-snag zipper mechanism.
Budget options: It's very difficult to find a lightweight (sub 2 lbs) 20-30ºF down sleeping bag that is significantly less expensive than the base $325 price of the Cumulus X-Lite 300. The closest budget option I've found (though not personally tested) would be the Sierra Designs Get Down 20º (35 oz, $180, women's here) - but that is nearly twice the weight! So in this case I'd highly recommend going for the Cumulus if you can swing it.
Sleeping Pad & Chair
Generally speaking, air mattresses are lighter, more compact to pack, warmer, and more comfortable on bumpy ground than closed-cell foam pads (especially for side sleepers). The obvious drawback (besides the expense) is the chance that it could pop or leak, so it's a good idea to carry an emergency repair kit and be extra careful to keep the mattress away from sharp rocks or pine needles. The most popular sleeping pad with backpackers is the Therm-a-Rest NeoAir XLite NXT (17oz in size large, $240), but I use an [older version of the] Exped Ultra 3R LW Sleeping Pad (16.4 oz, $160) which I prefer due to its more comfortable (in my opinion) vertical tubes and its soft, quiet material. Regardless of the air mattress brand, I highly recommend sizing up to a wide/long version which is much more comfortable and not much heavier - the extra 5" width allows you to rest your arms to your sides rather than dangling off in space and the extra length gives you plenty of room for your pillow and head. For couple camping we use [an older version of] the Exped Ultra 3R Duo Sleeping Pad (29.8 oz, $300), which is the same thing as the Exped above, but double wide for two people.

Sitting around in the Sea to Summit Air Chair above the Dolores River Canyon Wilderness Study Area, Colorado.
I also always bring along a Gossamer Gear Thinlight Foam Pad, Folded (3.3 oz) which I can pair with a Sea to Summit Air Chair (size S/M, 8 oz, $45) for a durable, comfortable, lightweight chair for much-appreciated back support during all those hours sitting around admiring the view. (Maybe I'm paranoid but personally I wouldn't trust the durability of an air mattress to use as a chair! Plus the Thinlight pad provides additional insulation and protection for your air mattress.)
For a pillow, I like the convenience of the Nemo Fillo Elite pillow (2.8 oz) but it's also perfectly fine to just fold a down jacket or sweater into the sleeping bag stuff sack.
Trekking Poles
Trekking poles save your knees, give you extra hiking power from your arms, and aid in balance. Collapsible poles are preferred for their ability to fit into travel luggage, or to strap to your pack when not in use. Cascade Mountain Tech Ultralight 2-piece Carbon Fiber Trekking Poles (10.3 oz/pair, $63) are lightweight, telescoping collapsible poles at a much lower price than most other similar trekking poles. I've learned that telescoping poles like this with quicklocks/fliplocks are more durable and reliable than Z-poles such as the Black Diamond Distance Carbon Z Trekking Poles. (After breaking 5 different sets of Z-poles, I've finally learned my lesson that this design just isn't durable enough). I think it's not a good idea to spend an exorbitant amount on poles since they do tend to break eventually.
Water Bottle
One Nalgene (or similar) water bottle. A Gatorade or SmartWater bottle would work just fine too.
Water Purifier
Some of my friends never filter water around here at all, but I'd rather be safe than sorry. There are a lot of options and different techniques for purifying water, and I've used just about all of them, but my absolute favorite is the Platypus GravityWorks 4.0L Filter System (11.5 oz, $135). Gone are the days of tedious pumping or squeezing; with the GravityWorks you just fill up a 4-liter "dirty" bag, hang it in a tree, and wait 10-20 minutes for the water to flow through the filter into another 4-liter "clean" bag. It really works well, and if/when it does start to slow down after numerous uses, you can just reverse the process to back-flow and clean the filter out. Plus, you have a 4-liter dromedary bag which is super handy for camping in awesome spots away from water sources. This system is a little bit bulkier and heavier than other purification methods but in my opinion it's totally worth it, at least with two or more people. The only drawback of the GravityWorks system is that it does take a while to filter the water, so it's not practical for quick filtering while hiking. Also, the filter membrane can be ruined if it freezes, so you have to be careful about that.
My second water purification choice for when hiking solo is the Platypus QuickDraw Filter (4 oz, $55) which weighs a mere 4 oz and filters a liter of water quickly on the go.
Stove
When my wife and I are backpacking together, our stove of choice is the Soto WindMaster Stove, which runs on standard isobutane fuel canisters. This tiny thing is lightweight and compact, has very nice flame adjustment for simmering, reliable auto-ignitor, and can boil water in breezy or windy conditions which contributes to fuel efficiency.
Budget option: Make your own cat food can alcohol stove! I made and used one of these for years.
Cookware
I would recommend titanium cookware, even though it's quite a bit more expensive. It will lighten your load and last forever. For the pot, cooking for couples, I'd recommend something in the 1-1.5 liter volume range such as the Toaks Titanium 1350ml pot. When solo backpacking I use the smaller and lighter Toaks Titanium 650ml Pot, which also doubles as a coffee mug. I also use a long titanium spoon, though plastic style spoons work fine too. Don't forget to bring a couple BIC lighters in case you want (or need) to start a fire; and store them someplace where there's no chance of getting wet.
Headlamp
Amongst the ultralight crowd, the Nitecore NU25 UL Headlamp is a classic. It weighs a scant 1.6 oz, shines up to 400 lumens, and only costs $37. But this is more of a campsite headlamp; since I often hike at night (chasing sunrise or sunset photos), I need a headlamp that can light up a trail better and longer than the little Nitecore.
My headlamp of choice is the Acebeam H17 2.0 Headlamp (3.5 oz, $70) which ticks all the boxes for me. It features a neutral white 4000K color temperature LED with a lovely wide floody illumination, and a max output of 2,000 lumens – plenty to light up your trail and the surrounding forest at night. But at a mere 3.5 oz it's quite a bit lighter and more compact than many other high output headlamps. I also appreciate its dim "moonlight" mode which is easy to access and won't blind you when you wake up in the middle of the night, and it also has a red LED mode which won't attract bugs.
Both these headlamps feature USB-C charging, so you can recharge them in the field if need be with a USB-C battery pack.
Knife

If you wanna feel like Rambo you've gotta have a knife out there! But let's be honest, its main job description is slicing salami and cheese. For these tasks the Spyderco Dragonfly 2 (1 oz, $70) is a good, sturdy, lightweight little knife. The Gerber LST Ultra (1.4 oz, $40) is nearly as light.
I also carry a tiny multi-tool like the Leatherman Style (discontinued) in case I need to fix something with pliers or scissors.
If you don't care so much about having a bigger knife blade or pliers, the Victorinox Classic SD is a good option, combining a small knife, scissors, screwdriver, and toothpick into a tiny 0.7 oz package for $24.
Toiletries
Don't forget your sunblock, toothbrush, mini travel toothpaste, and a travel bottle of hand sanitizer. As for TP, NEVER leave your toilet paper lying around after you're done! This is the number one most common offense of careless and disrespectful backpackers. After finding a private place a long distance from any campsite or trail, you should first dig a hole at least six inches deep, then bury everything when you're done. Sometimes it's easier to find a big rock, roll it over, poop in the hole, then roll it back in place. If the weather is damp and wet you can burn your TP, but of course never attempt this if there is any chance whatsoever of sparking a wildfire.
First Aid Kit
You can buy a prepackaged first aid kit like this, or just compile your own. Additionally, if you bring a phone, there are some good first aid apps that could provide crucial reference info when you're in the field, including First Aid: American Red Cross and Army First Aid.
Sunglasses
and sunglass case if you're anal like me about not scratching up your glasses.
Personal Locator Beacon
I always bring along a personal locator beacon (PLB) on any hike or backpack trip. The way PLBs work is that if you have a dire emergency in the wilderness you can activate an SOS and the device will alert an emergency center via satellite, who will then initiate rescue knowing your exact GPS location. The Garmin inReach Mini is a popular option which has the additional advantages of being able to send non-emergency texts via satellite, plus track your route progess, which can be handy for updating your loved ones while you're out.
Budget options: Signal mirror, loud whistle, and/or bright clothing can't contact anyone via satellite but they could sure as hell make it easier for rescuers or other hikers to find you.
Map and Compass
You've always got to have a map with you on backcountry treks. Fortunately nowadays we can have all the topo maps we want with us on our smart phones, using apps like Gaia GPS, with the added advantage that those apps will tell you your exact location on the map. The catch is that you have to make sure your phone doesn't run out of batteries! Battery life can be lengthened by always keeping your phone in airplane mode and by carrying a battery backup such as the Nitecore NB10000 Power Bank.

Our tent at a spectacular camp spot in Glacier National Park, Montana.
The Backpack
A backpack is probably the #1 item where you should really be careful what you buy, and buy the best available. A good backpack will last for many years and will make the difference between an enjoyable trek or a grueling march.
When you're shopping for a backpack, make sure that you load it up with lots of heavy stuff in the shop so you can feel how it really holds a heavy load. A good, well fitted pack will put most of the weight comfortably on your hips, not your shoulders, and it will sit straight without pulling backwards on your shoulders. Don't pay much attention to all the bells and whistles, like a bunch of cool pockets or whatever, but rather the main priority should be how well it carries a heavy load on your body.
Here's a tip: a sign of a good backpack is that the top of the internal pack frame rises up above the shoulder pads at least a couple inches (to your ear level), and the load lifters (the straps that pull the top of the frame towards the shoulder straps) angle upwards from the shoulder straps at about a 45º angle to the frame - this keeps the pack straight on your back without pulling backwards. Here is a great video from ULA demonstrating how a backpack is supposed to fit.

My current backpack of choice is the Durston Kakwa 40 (28.2 oz, $250). This pack (and its larger brother the Kakwa 55 at 30.1 oz, $260) has a rigid aluminum frame that solidly supports a heavy load; is very durable with its tough Ultra 200 fabric; has lots of useful built-in features like spacious hip belt pockets, a side zip pocket, a back mesh pouch, and shoulder pockets; yet the entire backpack weighs under 2 lbs, and the cost is a reasonable $250! Remarkable! The packs are each available in three sizes, to fit just about anybody's torso length, men or women. (Tip: if your torso length falls near the transition of one of the sizes, then size up).
I would say that the larger Kakwa 55 is probably the best choice for most backpackers, who will appreciate a bit of extra space to stuff all their stuff. That said, if you've got your ultralight/minimalistic kit dialed in, the Kakwa 40 is a good streamlined choice.
If you anticipate carrying heavy loads, whether it's for bulky gear, lots of camera equipment, or food for week+ treks, then you'll want to step up to the Seek Outside Divide Ultralight Backpack (44 oz, 79L, $439+). Designed and built in western Colorado for hunters packing out super heavy loads, Seek Outside backpacks are lightweight but have a beefy suspension that will carry heavy loads more comfortably than pretty much any other backpack on the market. These packs are durable and comfortable, with an adjustable torso length as well as optional frame extensions for further adjustment. All the straps are also modular and configurable.
Budget option: Although I haven't used one myself, the Granite Gear Crown 60L (2lb 4oz, often on sale at $150 or less) is affordable, ultralight, has good reviews, comes in three back sizes, and is often on sale for significantly discounted prices. They make a women's version too.
Rain Cover
Don't want your backpack to get wet if/when it rains on you! Osprey Ultralight Rain Covers are nice, or if you're willing to spend a bit more the Zpacks Pack Covers are dyneema and half the weight. Budget (and perhaps better) option: use a trash compactor bag as a pack liner inside your pack, then you don't need a rain cover.
Backpacking Clothes

The main rule of camping clothes: NO COTTON! When cotton gets wet, it does not keep you warm, it is heavy, and it takes forever to dry. It's better to use wool or high-tech hiking fabrics, which are lighter, will breathe better, keep you warmer, and dry faster. Here is the essential summertime backpacking clothes list:
• Lightweight, breathable hiking shirt. This will get sweaty! Patagonia Capilene Cool Daily short sleeve shirts are nice.
• A long-sleeved shirt for hanging out at camp in the sun and at night. I like the Patagonia Tropic Comfort Hoodie.
• A sweater or insulated jacket. Down jackets (or down sweaters) pack light and compact but provide LOTS of warmth, especially when layered under a shell jacket. Down jackets with hoods provide even more warmth when needed. These can also double as a pillow when folded into a stuff sack at night. As an ultralight junkie my down jacket of choice is the Zpacks Goose Down Jacket, which weighs a scant 7.4 oz (in the Large size), but provides ample warmth with its generous down fill, long waist length, and hoodie.
• A shell jacket to protect from rain and wind. When it comes to rain gear, keep in mind that there's no such thing as a waterproof AND breathable fabric. So if your jacket is 100% waterproof, it will feel super clammy and you'll still get wet just from your own perspiration and condensation. So the purpose of shell clothing is more about windbreaking and keeping you sort of dry enough for a while until you can find shelter. The Enlightened Equipment Visp Rain Jacket weighs only 5.6oz and does this job well.
• Shell pants, with side zips (or at least partial ankle side zips) so you can pull them on and off over your boots. The Outdoor Research Helium Rain Pants (5.4 oz) are lightweight.
• Shorts. Preferably something lightweight, quick drying, durable, and allowing easy range of motion. The Montbell Cool Shorts are cool.
• Undies. As with everything else, go for something non-cotton like nylon/spandex/wool, which dry out quickly after a sweaty day of hiking. I usually bring along a spare so that I don't stink too badly after a week of trekking. I like Saxx Quest 2.0 Boxers.
• Long underwear. Smartwool Merinos are nice traditional wool underwear. Lately I've preferred the ultra comfortable and lighter weight FarPointe Alpha Camp Pants.
• A sun hat, or a ballcap with sun cape or a handkerchief underneath to shade my neck. I like the Outdoor Research Sun Runner Hat which comes with a sun cape that shades my neck and stays in place even in windy weather.
• Gloves and a warm beanie for when it gets cold. The North Face Etip gloves are warm, lightweight, and touch-screen sensitive.
• I sweat a lot so a sweat band is a must for me to keep my sweat out of my eyes; I don't care that it looks super dorky! The Halo Headband has a much thinner profile than typical sweatbands, so it fits nicely under a hat.
• Socks. Wool socks are more durable and will keep your feet warmer when they're wet. I prefer lightweight wool socks like the Smartwool Performance Hike Light Crew Sock. On longer treks, I'll take three pairs of socks, one of which I keep for camp and sleeping.
• Sturdy boots. To protect my feet and provide a solid foundation for my body, I wear sturdy hiking boots with good insole inserts that provide better arch support. My current boot of choice is the lightweight Lowa Innox Pro GTX Mid Hiking Boot (37oz/pair), which is sturdy yet still flexible enough for comfortable walking. I highly recommend swapping out your boots' flat insoles with ones that have more arch support, such as Spenco Total Support Max Insoles or Superfeet. If you've got a super lightweight pack and are hiking purely on well groomed trails, you might be able to get away with wearing running shoes, but you will regret it if you're hiking over talus fields, crossing streams, etc.; plus, you run a much higher risk of common injury such as twisting your ankle. Boots are better.
• A lightweight pack towel to wash with. On multiday trips the best option is to jump into a lake or stream, or splash-wash yourself next to a lake/stream with a small bottle of eco-friendly soap, then use the towel only to dry yourself off. This keeps the towel clean for the duration of the trip. Or, if options are limited or it's super cold out, you can just do a towel wash with a wet towel. If you're just doing towel washes, you can go with an ultralight Lightload towel to save a few grams.
• For convenience I put all my spare clothes into a stuffsack. I typically just use the blow-up bag that the air mattress comes with, since I'd bring that anyways.
Sun Protection

Sun protection is one of those things that many people probably don't worry about enough. Sure, maybe you'll put on some suncreen in the morning and maybe you'll get a bit of a minor sunburn by late afternoon but who cares, not a big deal, right? Well, let me tell you when your doctor informs you that you have basal cell skin cancer and you have to get several chunks of your face carved out, that's a serious wakeup call! That happened to me a few years ago, and sun protection became a top priority real quick. I wish I had been more vigilant about it in the 20+ years I've been hiking and backpacking in the high altitude Colorado sunlight. I hope if you're reading this that you can learn from my lesson and make sun protection a top priority for yourself now before it comes back to bite you.
While sunscreen is a necessary part of sun protection, by far the best protection is physical protection, meaning clothing and shade. This is tricky though for strenuous exercise in hot weather; long sleeve shirts and pants can be unbearable in the heat. Fortunately there are some fantastic items available that are designed just for this.
• The Outdoor Research Sun Runner Hat comes with a sun cape that shades your neck and stays in place even in windy weather. In my opinion this is superior to traditional round brimmed sun hats because: 1) Sun hat brims often flop up in the wind, thus rendering them ineffective; 2) Sun hat brims often hit your backpack behind your head, which simply won't work for hiking; and 3) Brimmed sun hats don't shade your face or neck when the sun is lower in the sky.
• Outdoor Research ActiveIce Sun Sleeves are a great way to keep your arms protected without slathering sunscreen all over them (and having to clean it off every night). The ActiveIce fabric really works: it has a phenomenal evaporative cooling affect that actually keeps your arms cooler than they'd be uncovered in the sun! Plus, the sleeves have thumb holes so they can cover your entire hands too except your fingers. They also have a Bugout version if you're in mosquito territory.
• Outdoor Research ActiveIce Chroma Sun Gloves will protect your hands while offering durable support while hiking with trekking poles.
• Lightweight hooded sun shirts provide great sun protection, particularly when you're just hanging out at camp or around town or whatever. I prefer models that don't have a restrictive "turtle neck" effect which I find to be claustrophobic on hot days. I've tried a bunch of these and my favorite is the Patagonia Tropic Comfort Hoodie (though sadly that's been discontinued and I haven't found a replacement quite as good yet).
• The lightest, most breathable hiking pants I've found are the Montbell Cool Pants (Men/Women) which are possible to wear while hiking on moderately warm days. On really hot days I can't deal with any long pants so sunscreen has to suffice for my legs.
• As for sunscreen, it can be difficult to find the perfect sunscreen that isn't too greasy or chemical smelling, and doesn't leave a ghostly white residue on your skin. The best one I've found so far is Biore UV Aqua Rich SPF 50. Don't forget that you MUST reapply sunscreen periodically throughout the day. This is the main drawback of sunscreen: that oftentimes we are too lazy or forgetful to reapply it, not realizing that its effectiveness declines after a few hours. Also, don't forget to sunscreen every exposed spot, including your ears and temples.
Backpacking Food and Food Storage
Before discussing backpacking food, it's important to talk about how to properly store your food while in the backcountry in order to keep both you and your food safe from critters both large and small. Contrary to popular belief, hanging your food with ropes is a very poor solution - not only is it a pain to do properly, but you know black bears are excellent tree climbers, right? Bear canisters like the BearVault BV500 work well, but are way too heavy and bulky, and therefore should only be used where they are mandated, like in some national parks.
The best solution is an Ursack Major Bear Bag, a super strong Spectra fabric food bag which is much lighter than a normal bear canister. You put your food into an odor-proof plastic bag inside, then tie the bag to the base of a tree away from your tent. Bears cannot tear the bag or the rope, so they can't steal your food.
Remember: NEVER STORE ANY FOOD IN YOUR TENT! Do not give bears a reason to come sniffing around. Or smaller critters either, for that matter. We once had some aggressive squirrels chew a hole through our tent trying to get to some toothpaste we left in there!

As for backpacking food, the key is a high calorie to weight ratio. So that means dried meals and dense, high calorie snacks with a high fat to carbs ratio.
For dinners, we prefer to dehydrate our own meals. This is a big topic in itself with lots of different strategies, but the way we do it is to cook a big batch of a meal at home (like pasta sauce, chili, chicken pot, lentil soups, etc.) making sure to dice the veggies and other ingredients into thin pieces. We then spread it out thin on vinyl trays in our dehydrator. After about 8 hours of dehydrating, the meal becomes a brittle "leather" which we break into pieces and vacuum seal into small, labelled pouches. When it's time for dinner in the backcountry, we empty the meal into a pot, pour water into it, let it sit for about a half hour to rehydrate, then heat it up over the stove. The result is a hearty, delicious meal that tastes as fresh as it was when we first cooked it!
A less labor-intensive and more common approach is to buy freeze dried backpacking meals, many of which are quite delicious these days! Mountain House has been making freeze dried meals forever and they are still my go-to favorites. Another good brand is Peak Refuel, which packs more calories (but watch out for the saturated fat!). Also check out Packit Gourmet, a little spendy but tasty.
A couple tips for the freeze dried backpacker meals: 1) They always say "2 servings" but it's one serving. After a big day of hiking, you will eat the whole thing yourself. 2) Before you pack the meals in your backpack, open the pouches, remove the desiccant pack, squeeze out the excess air, and reseal. This will save a lot of space. 3) For a multi-day trek, you only need to bring one or two of these meals in its pouch. You can repackage all the other meals in ziploc bags, which will save space and weight. Then, just reuse the one pouch each night to cook every meal in. 4) For strenuous multi-day treks, you can boost your meals' calories by adding olive oil; Marconi Olive Oil packets are convenient for this.
For breakfasts we usually have powdered cappuccino/instant-coffee mix (a sugary delight) followed by Skurka's quickstart cereal or cheesy potatoes recipes.
For lunch we have things like a block of hard cheese (something that won't melt in heat; ask the people at the cheese counter in the supermarket), salami, pita bread, and/or high calorie chips like Fritos, Triscuits, or pita chips. On shorter trips (or early on a longer trip) you can splurge a bit and bring avocados and/or some fresh veggies and hummus or spreadable cream cheese and make a tortilla wrap.
For snacks: nuts, trail mix, chocolate, energy bars, etc.
I've also recently become a fan of post-exercise recovery drinks like Mike's Mix Recovery Drink which supposedly give your body a quick shot of nutrients when it's most ready to absorb them (within 30 minutes of finishing your hiking).
For lots of expert backpacking recipes, check out Andrew Skurka's blog.
My Backpacking Camera Gear
Since this is a photography blog and I'm a photographer, here's my current camera gear that I often take with me on most backpacking trips, in case you're interested.
- Sony A7CR camera
- Sony 20-70mm f/4 G lens. This amazing little lens is versatile enough for a one-lens kit oftentimes!
- Sometimes I will also take a selection of one or two of the following lenses (or other specialty lenses), depending on what type of shooting I anticipate, and/or how much more weight I'm willing to carry:
- Marumi Super DHG circular polarizer
- 1-2 extra camera batteries. Usually 3 batteries will last me for a 7-day trek, if I'm careful.
- Leofoto Ranger LS-224C tripod with Leofoto LH-22 ball head

I typically carry the camera with zoom lens in a Hyperlite Camera Pod toploader chest pouch (more streamlined than the one pictured above) which is rigged to my backpack's shoulder straps with releasable clips. This keeps the camera handy for easy and immediate access while I'm hiking, and also nicely balances my backpack load by putting the camera weight on my chest and not completely on my back. The Hyperlight Camera Pod size R just barely fits my Sony A7CR with 20-70mm lens; anything bigger and you'd want the L size. It's also waterproof, which is convenient.
Depending on the sizes, a spare lens or two can fit into an F-Stop Micro Tiny ICU, which goes into the top of my backpack. The tripod gets strapped to the side of the pack.
Optional Extras
Here are some things that we may or may not bring, depending on the trek and/or how much we're willing to carry:
• A chair! Over the years I've realized that one major factor that causes back pain when backpacking is spending hours sitting awkwardly on rocks, logs, or the ground with the inevitable bad posture that ensues. A lightweight chair can help a lot to alleviate those aches and pains, not to mention it's such a nice luxury to have a comfy and supportive seat to relax in at camp after a long day of hiking. The best lightweight backcountry chair system I've found is the Sea to Summit Air Chair (size S/M, 8 oz, $45) combined with the sleeping mattress of your choice. Although the chair is designed to be used with an air mattress, I prefer using it with a minimal Gossamer Gear Thinlight Foam Pad, folded (3.3 oz), since personally I wouldn't trust the durability of an air mattress to use as a chair around camp surrounded by pine needles and sharp rocks.
• A dromedary bag. This is useful for hauling water, allowing you to camp in awesome locations that aren't necessarily near a lake or stream, like high ridges. Sometimes useful in Colorado, this is often a must for the desert. If you use the Platypus GravityWorks 4.0L Filter System then you've already got a 4-liter dromedary bag; otherwise check out their Replacement Reservoirs (4L or 6L Clean Bags). If you're camping far from water, we have learned that you'll need 4L of water per person per night (afternoon, evening, and morning).
• Bear spray. A must in places with grizzlies like Montana, Canada, and Alaska, but not really necessary in Colorado.
• Bug spray and/or head net, depending on the location and time of year. During the summer months we usually bring bug spray, but not the head net, which is only needed in places where the mosquitos are horrendous; usually it's not that bad in Colorado. I like Ben's bug spray, which doesn't have such a noxious odor. 30% DEET is usually plenty. If you are in a place where you actually need a head net, you might also appreciate a bug-repellant shirt such as the LL Bean Insect Shield Pro Knit Hoodie. LL Bean has an extensive line of insect-repellent clothing for women and men.
• Umbrella! If the forecast calls for a lot of rainy weather while hiking, an umbrella is a great item to have. Why? Because most waterproof rain jackets are not very breathable, and you will be probably be drenched with sweat in addition to being miserably hot in that jacket. An umbrella completely solves that problem, and you will be SO much happier hiking in the rain with one. It's also very useful for keeping your camera dry when photographing in rainy weather. The top pick for backpackers would be the Six Moon Designs Rain Walker SUL Umbrella (5.5 oz, $60). If you really want to rock, pair the umbrella with a ULA rain quilt and you'll be cruising through the rain without a care in the world! (Except for maybe how you look).

• Entertainment! Cards, Sudoku, a lightweight book (I wrote about backpacking books here), perhaps a Kindle, and maybe a lightweight journal or sketchbook. I have these great knot-tying playing cards, so when we're not playing Rummy or Wizard I can brush up on my bowlines, bends, and hitches! Ounce-counters might prefer mini playing cards instead.
• USB battery recharger for recharging your phone and/or other devices. As mentioned above, the Nitecore NB10000 Power Bank is a good compact choice for recharging your phone and other devices several times.
• Binoculars. Not really necessary for most backpackers, but they can be fun for exploring the landscape from a high perch.
• And not pictured: the vices. A flask of whiskey, tequila, or [pick your poison] can be a treat when backpacking with friends. I met some guys in the wilderness once who were proponents of packing Everclear instead, because as they claimed, "it's half the weight!" Hardcore. Those of you in Colorado, Washington, or other personal-freedom-allowing states might enjoy bringing along some cannabis which I've heard goes well with being out in nature - and it's ultralight too! If that's your jam, you might wanna check out Dangle Supply's titanium tools.
My Winter Camping Gear
Winter camping is a whole 'nother ballgame. It's more of a suffer-fest than anything, and I don't really recommend it to anybody. However, during the winter I still get that urge to go out and backpack in the wild and take photos. Typically I don't go winter camping more than once a month, because it takes at least a month after each trip to forget how brutal it was!
In any case, here's what I take on winter backpacking trips:
Instead of listing every single thing again, I'll just list the main differences from the summer setup.

Black Diamond HiLight tent at 13,200 ft. high camp in the Sneffels Range, Colorado.
• WINTER TENT: For snow camping, my main criteria for tents are storm-worthiness and ease of setup. Although floorless pyramid tents are lightweight and popular for winter camping, they require more time and effort to pitch since you need to stomp out a huge area in the snow and the structural integrity depends on lots of guylines with buried anchors. So I prefer freestanding or mostly-freestanding tents with a small footprint area and a minimal amount necessary anchors. This ease of setup is VERY important when it's frigid, snowing, and/or windy, and your hands are getting numb. Oftentimes every minute counts in the winter.
I've also learned that double-wall tents (with solid interior fabric) are noticeably warmer than single-wall tents, can allow decent ventilation without the cold breezes you get from single-wall tent vents, and suffer much less from frozen condensation.
Also, the extra space of a 2p tent is likely worthwhile even when solo so that you have room to spread out all the extra winter gear you'll have.
Here are some good double-wall winter tent choices:
- My current winter tent of choice is the Montbell StellaRidge 2 with extended rainfly (unfortunately I don't see that available on their website currently) which together with poles and guylines weighs in at about 58 oz. This is warm tent, and the extended vestibule option offers a sheltered place to cook and get in and out of the tent when it's snowing. But with an interior length of just 82.7" this tent is probably not a good choice for taller people (I'm 5'8" and that's about the max for this tent).
- Big Sky International Chinook 1P Tent (49 oz) or 2P version (64 oz) with 2 people. These are bomber, well designed, relatively lightweight, double-wall tents that can handle just about any winter weather. They are very expensive, though, and often not in-stock.
- Tarptent Moment DW Li with solid interior – at 26 oz this is much lighter than most double-wall 4-season tent options. Only requires 2-4 anchor points. Two side doors with opposite facing vestibules means you can cook and melt snow a bit sheltered in the vestibule no matter which way the breeze is blowing. However, the interior mesh vents are not closable and are bigger than I'd prefer for keeping the cold winter breezes out, so this tent is likely not as warm as the two options above. For intense winter weather you can beef this up with an aluminum pole (instead of carbon fiber) and an additional aluminum crossing pole for a total package of 41 oz.
- Most other dome-style 4-season tents (such as the Slingfin Hotbox for example) have the door at the head of the tent, which is a flawed design because if it's snowing, the snow falls right into your tent when you open the door – so it can be a struggle to cook or melt snow from inside the tent.
- Finally, some say that hot tents with a wood-burning titanium stove and stove pipe (such as Seek Outside's) are a game changer for winter camping, but personally I'm not convinced that the extra weight and hassle are worth it, unless for a multi-day base camp situation with friends (in which case it would probably be pretty great!).
• TENT SNOW ANCHORS: Obviously normal tent stakes are useless in snow. The easy solution, if you're camping anywhere near a forest, is to just use sticks or tree branches as snow anchors. You loop your guyline around the branch then just bury the branch under the snow and stomp the snow down around it; the snow will harden around the branch forming a solid anchor. (Pro Tip: use a trucker's hitch knot to tie your guylines around the sticks, then you can pull your cord in the morning without needing to dig up the frozen-solid snow!). If you are camping someplace up high where there are no trees, you might need to bring dedicated snow anchors, which are basically like little fabric parachutes that you fill with snow and bury the same way. Plastic grocery bags can also be used the same way.
• WINTER-RATED SLEEPING BAG: You'll need a much thicker and warmer down sleeping bag to stay safe and comfortable through frigid winter nights. My winter bag is a Feathered Friends Widgeon -10º sleeping bag (3 lb 4.3 oz, $759). Synthetic winter sleeping bags can be significantly cheaper, but are also significantly heavier and bulkier. For multiday winter camping trips you may also want a vapor barrier liner, which prevents heat loss and keeps your sleeping bag from getting wet from your body condensation, thus keeping it warming over longer periods. Budget option: You can experiment with layering two lighter sleeping bags together, plus wearing your down jacket and down pants to bed too.
• WARMER SLEEPING PAD: A sleeping pad with a high R value is necessary to keep you insulated from the snow or cold ground in the winter. I use a Therm-a-Rest NeoAir XTherm air mattress (long/wide preferred) and I also bring the Gossamer Gear Thinlight Foam Pad or similar, just for extra insulation and as an emergency backup in case the air mattress pops.
• 2 NALGENE (OR SIMILAR) BOTTLES. In this case, they must be Nalgene bottles, or similar sturdy thick plastic bottles. The reason for this is because you can fill up the bottles with hot water and put them in your sleeping bag to keep warm at night! Also, by having multiple bottles, you can fill them all up with melted snow water in one sitting, then have water for longer. A great choice for winter are the 40 Below Cold Weather Bottles, which have a large threaded cap which is easier to open when frozen.
• WINTER-SUITABLE STOVE + LARGER POT: Although I don't yet have one myself, I've read enough reviews that I'm gonna recommend the MSR Reactor Stove System with 1.7 L pot. This integrated system with heat-exchanger pot is one of the most efficient and fastest boiling stoves on the market, which is important for conserving fuel while efficiently and quickly melting snow for water. Less efficient stoves take way longer to melt snow and burn through much more fuel. A larger pot like this or bigger is also convenient so that you don't have to constantly repack the pot with snow as it melts. Make sure your stove is functional and reliable before you go - if your stove breaks or you run out of fuel, you have no water, and with no water, you must leave immediately!
• SHOVEL: Whether you're digging out a snow cave, building an igloo, or simply carving out a flat spot for your tent, a shovel is a must for winter camping. You can also use the blade as a platform for the stove. A lightweight aluminum ski/snowboard avalanche shovel like the Ortovox Pro Light Shovel is perfect for this; just make sure that it's a metal one, not plastic. If you are building an igloo, you'll appreciate an oversized shovel to move lots of snow around quicker and more efficiently.
• WINTER POLES: You need to have the big snow baskets on them, which the summer trekking poles don't have. I highly recommend the Black Diamond Expedition 3 Ski Poles which are durable, lightweight, and have a telescoping collapsible design with easy to use flicklocks.
• Since the bears are probably hibernating, I leave the bear bag behind and keep my food in the tent with me.
• Remember to keep your spare batteries inside your down jacket at all times to keep them warm (cold batteries die sooner). Some people recommend keeping your boots inside your sleeping bag at night, but I don't do this.
• What's not shown here are skis or splitboard, and all that entails, or their mobility-challenged little cousins, snowshoes. One way or another, you'll need a way to get through all that deep snow!
• I also have not included avalanche beacons or probes - here's why: I do not know anybody else who enjoys winter camping, so I always just go out alone; thus, beacons or probes are useless to me. I do, however, only go winter backpacking on routes that are safe from avalanches - no steep slopes whatsoever. This severely limits my options, especially in the San Juans where the mountains are mostly all steep. But I would rather return home safe! All that said, if you're going out with partners, definitely bring your avy beacons, shovels, probes, and of course the knowledge of how to use them and and how to assess avalanche danger.

My camp with the MSR Twin Sisters tent on Hurricane Pass, on a gorgeous calm moonlit night in the Tetons, Wyoming.
Winter Camping Clothes
Obviously you're going to need more warm clothes in the winter! Again, NO COTTON. Here's my list:
• Performance long-sleeve hoodie shirt for hiking in cold temps and/or bright sun.
• A winter weight long-sleeve shirt and long underwear bottoms. These are heavyweight shirts that are not meant for hiking in, but just for sitting around in the winter. Very, very warm for the weight. I love the Patagonia Capilene Thermal Weight One-Piece Suit which is even more thermally efficient as there's no gaps at all between your tops and bottoms (though sadly it looks like it's been discontinued).
• Softshell jacket with hoodie. Softshell jackets are great for winter hiking as they protect you from the elements but are breathable enough for strenuous exercise, especially with big pit zips. The hoodie is useful for windy or blizzard conditions. You might want a size larger than usual so you can wear this as an exterior layer over your poofy down jacket when you're at camp.
• Poofy down jacket with hoodie. The most important piece of clothing! A big, thick down jacket will keep you toasty warm on even the coldest days. I definitely recommend one with a hood, since it keeps the drafts out and insulates your head and neck much better, and also a long back length that will cover your butt so you don't have drafts around your waist. When shopping for a winter-weight down jacket, pay attention to the weight, the fill weight (how much down is stuffed into it), and the fill power (the quality or warmth of the down: 800FP is good, 900FP is excellent). Top contenders here are the Cumulus Neolite Endurance, Montbell Alpine Down Parka, and RAB Mythic Ultra. For further research and comparisons, check out this handy Winter Expedition Weight Down Jacket Spreadsheet.
• A down vest like the Montbell Alpine Light Vest adds a huge boost of body warmth for a minimal amount of extra weight.
• Layered over your thermal underwear, the 90gsm FarPointe Alpha Camp Pants are cozy and add a lot of extra warmth for their minimal 4.2oz weight.
• Western Mountaineering Flight Down Pants. After years of lusting after down pants, I finally sprang for a pair and OMG, they are awesome! I can't believe I've ever gone winter camping without them. The full length side zips are handy for when it gets too hot, and reinforced butt and leg fabrics add durability. You can also wear these to sleep to boost your sleeping bag warmth.
• Ski/snowboard pants. The summer shell pants won't cut it in the snow. Make sure they have side or thigh zips for ventilation while hiking. It's better to get non-insulated pants to not overheat while hiking, then you can layer underneath as needed. I like the North Face Freedom pants.
• Winter boots. If I'm splitboarding, of course I'll be wearing snowboard boots, which generally are comfortable and warm. I prefer very flexible boots; you don't want to spend days in stiff boots. The K2 Taro Tamai Snowsurfer Boa Boots are relatively flexible snowboard boots that also have high-end features like durable vibram rubber soles and boa lacing systems. For snowshoeing or winter trips when I'm not splitboarding, the Baffin Control Max Insulated Boots are extremely warm and comfortable.
• Vapor barrier socks prevent your boots and/or down socks from getting damp from moisture from your feet, keep your feet noticeably warmer over a longer period of time. Rab Vapour Barrier Socks are super lightweight and do the trick. Or for super cold weather the RBH Designs VaprThrm Insulated Socks are thicker and even warmer.
• Down Booties. As opposed to down "slippers", down booties have rubber soles so you can walk around outside in them. They are lightweight and easy to pack, and comfortable and warm for when you're lounging around camp. I like the 40 Below Camp Booties, which have straps that keep your feet more stable on the soles.
• Depending on how snowtight your pants and boots are together, you might need gaiters keep the snow (and wind) out. Outdoor Research Rocky Mountain High Gaiters are good ones.
• Warm gloves. Mittens are even warmer, though you lose dexterity. I prefer a combo of warm liner gloves with a vapor barrier mitten shell. A great combo is the North Face Apex Insulated Etip Gloves along with the RBH Designs Ultralight Mitt to go over them and keep my hands toasty warm.
• Hand warmers. Especially for photographers who must use thinner gloves when fiddling with the camera, hand warmers will keep your blood warm and your fingers from freezing.
• Warm beanie, such as the Zpacks Brushtail Possum Beanie, along with a lightweight beanie for hiking such as the Buff Lightweight Beanie.
• No matter how bundled up you are, in very cold and windy weather your face will still be exposed to the elements, so a face mask or neck gaiter can be the final piece of the puzzle to keep you warm and safe from frostbite. A removable face mask that velcros on is advantageous since you can put it on without removing your hat. Otherwise a balaclava or tube style neck gaiter such as a Buff are lightweight and compact.

Camping up in Indian Peaks, Colorado during a September snowstorm in the Big Sky International Chinook 2P tent.
Backpacking Gear Budget Comparison
Here is a list of my recommended summer backpacking gear (for a 1-person backpacking kit not including clothes, accessories, etc.) compared to similar but less expensive options.
| Jack's Picks | Weight (oz) | Price | Budget Picks | Weight (oz) | Price | ||
|---|---|---|---|---|---|---|---|
| Backpack | Durston Kakwa 40 | 28.2 | $250 | Granite Gear Crown 60L | 34 | $200 | |
| Tent | Zpacks Duplex Lite | 18.45 | $599 | MIER Lanshan 1 | 27.2 | $139 | |
| Sleeping Bag | Cumulus X-Lite 300 | 19.6 | $420 | Sierra Designs Get Down 20º | 35 | $180 | |
| Sleeping Pad | Exped Ultra 3R LW | 16.4 | $160 | Exped FlexMat Plus Sleeping Pad | 17.6 | $41 | |
| Trekking Poles | Cascade Mountain Tech Ultralight 2-piece Carbon Fiber | 10.3 | $63 | 10.3 | $63 | ||
| Water Purifier | Platypus Quickdraw Filter | 4 | $55 | Sawyer Squeeze | 5.7 | $37 | |
| Stove (not including fuel) | Soto WindMaster | 2.72 | $70 | cat food can alcohol stove | 0.3 | $1 | |
| Headlamp | Acebeam H17 2.0 Headlamp | 3.5 | $70 | Nitecore NU25 | 1.6 | $37 | |
| Total | 103.2 oz 6.45 lbs | $1757 | 131.7 oz 8.23 lbs | $698 |
As you can see, it's possible to compile a comparably lightweight backpacking kit for less then half the price as my top picks!
Of course, there's more to it than just the weight numbers; my recommended gear choices offer superior performance, comfort, and convenience. For me personally as an avid [and possibly obsessed] backpacker, it's worth the ~$1000 premium for this top-of-the-line gear. But the difference isn't necessarily that much, so really there's no reason to spend so much money when you can be equally well equipped with less expensive gear.
Also worth mentioning is that you don't necessarily need to go ultralight or spend even $800 to get into backpacking; you can likely find all of the gear you need in used marketplaces or thrift stores for much cheaper than these budget listings.
Shopping for Backpacking Equipment
If it’s not entirely obvious by now, collecting all of this gear can be a very expensive endeavor! Here are a few ways that you can cut the costs:
• Do your research first! Make sure you're buying the best option you can afford, rather than buying something on impulse then eventually upgrading later. My go-to resources for researching outdoor gear are Backpacking Light, Reddit r/Ultralight, Gear Lab, Adventure Alan, and Section Hiker, to name a few.
• If you’re shopping online, always search prices first before you buy something. Tools like Google Shopping help to find good deals.
• Be patient! If you’re not in a hurry to buy certain gear, just wait until it goes on sale, which eventually it will if it’s sold by any of the big online stores.
• Spring is probably the best time of year to find great deals on gear; many online retailers slash prices and have big sales to try to unload last season’s gear before the next year’s inventory comes in. This is an especially good time to buy winter gear, with down jackets and ski gear often on sale for 50% or even 75% off. Around Memorial Day time (late May) almost every shop has big sales. Black Friday is of course another time for big discounts.
• Sign up for sales newsletters from the big outdoor online retailers like REI, CampSaver, Enwild, etc. as well as the bigger outdoor companies like Outdoor Research, North Face, Patagonia, etc. I know you probably don’t want more ad emails in your inbox, but this way you can be sure to catch promotional deals; for example, many of these stores regularly offer discount codes for 20% off any full price item.
• Go to local ski swaps. In many towns, at least here in Colorado, there are big annual ski swaps where companies and stores unload all their old stock at cheap prices, or where people sell their used stuff.
• Do you have a friend in the biz? I’ve been fortunate to have had the opportunity a number of times to buy (or trade photos for) a batch of gear from friends who have the coveted “pro deal” – items direct from the warehouse for less than wholesale price. This is probably more likely to happen if you live in a mountain town, where mountain athletes live, but ER doctors and EMTs can also get these deals.
Leave No Trace
Through my trip reports and informational articles like this, I hope to inspire people to get out backpacking in the wilderness, because I truly believe it’s one of the healthiest and most satisfying things a person can do – physically, mentally, and spiritually. I also believe that the more people go out and immerse themselves in nature, the more likely they will be to support the protection and preservation of wild places. But on the other hand, this only works if backpackers respect nature and the wilderness while we’re out there. So I think it’s worth listing here the Leave No Trace Seven Principles which apply whenever you are camping, whether it’s next to your car or deep in the wilderness. I will add some further comments of my own to elaborate.
1) Plan ahead and prepare. Know the regulations and special concerns of the area, be prepared for possible weather and hazards, schedule your trip to avoid times of high use, and go in smaller groups rather than large groups.
2) Travel and camp on durable surfaces. Use established campsites whenever possible, or campsites on rock, hard dirt, or dry short grass. Don’t camp right next to lakes or streams, and don’t trample meadows and wildflowers.
3) Dispose of waste properly. See above my comments above about TP. Basically poop far away from any potential campsites, trails, or water sources, and bury your poop and TP.
4) Leave what you find. Don’t take artifacts or plants. Leave places as you found them.
5) Minimize campfire impacts. Do you really need that campfire? Especially deep in the wilderness, the answer is no, you don’t really need that campfire. Don’t create new fire rings, especially up on fragile tundra areas or near lakes.
6) Respect wildlife. Don’t harass wildlife just to get a photo. Store your food properly. Keep your dog under control or leave them at home.
7) Be considerate of other visitors. This is so common sense but I think I should still spell out some things: Leave your portable speaker at home; nobody wants to hear your tunes in nature. Don’t camp right nearby other campers. And definitely no drones in wilderness areas!!!

I hope that if you’ve read this far, you’ve found some helpful tips and suggestions for attaining and/or improving your backpacking gear collection, and enjoying your time in the backcountry. If you have any other tips you'd like to share with me, I'd love to hear them in the comments below.
If you are discouraged by the sometimes outrageous prices of some of this gear, remember that people have been adventuring in the mountains for hundreds of years, using gear that was probably worse than what you could compile from a thrift store nowadays! As long as you can get the basic essentials, you can make it happen.