In addition to my fine art prints, I am excited to now offer custom-sized, ready-to-install wall murals! From dramatic mountain landscapes to calming forest scenes, these immersive murals bring a large dose of natural ambiance and colorful beauty into your home, office, restaurant, retail space, or care center.
These high quality wall murals are printed on a sturdy vinyl material with a lightly textured matte surface that displays excellent clarity and vibrant color without any distracting shine or reflections. The vinyl material features an adhesive back that sticks to the wall securely but not permanently, allowing for easy installation. Large murals will come in overlapping panels with marked match-points so you can easily align them in place, with the seam nearly invisible.
Custom Sized to fit your wall
Since every wall size is unique, these wall murals are custom printed to exactly match your wall space. The photos can be resized and/or cropped to get the perfect fit for your wall, and I will email you previews of the exact image sizing before the mural is produced.
How to Order a Wall Mural
Each mural is custom printed to the exact size of your wall, so the first step is to accurately measure your wall for the width and height needed.
The mural pricing is based on the square footage and you can calculate the price here (shipping is free within the United States):
Once you've picked out the photo (or a selection of possible photos) you want to use and know the exact width and height of the wall, please contact me to let me know all those details. I am also happy to offer assistance and advice for choosing the perfect photo for your wall.
Once we've confirmed the photo choice, mural size, and final price, you can then send the payment here with credit card. Please allow 3-4 weeks for production and delivery.
Please note that due to the custom nature of these murals, all sales are final.
Installing the Wall Mural
These wall murals are relatively easy to install as long as you follow a few key tips below.
You will need two people to do this, a stool or small ladder, and a razor blade and ruler to trim the mural if there's any slight excess. A roll of painter's tape (masking tape) can be helpful to temporarily hold the mural panels in place while you ensure the alignments are correct.
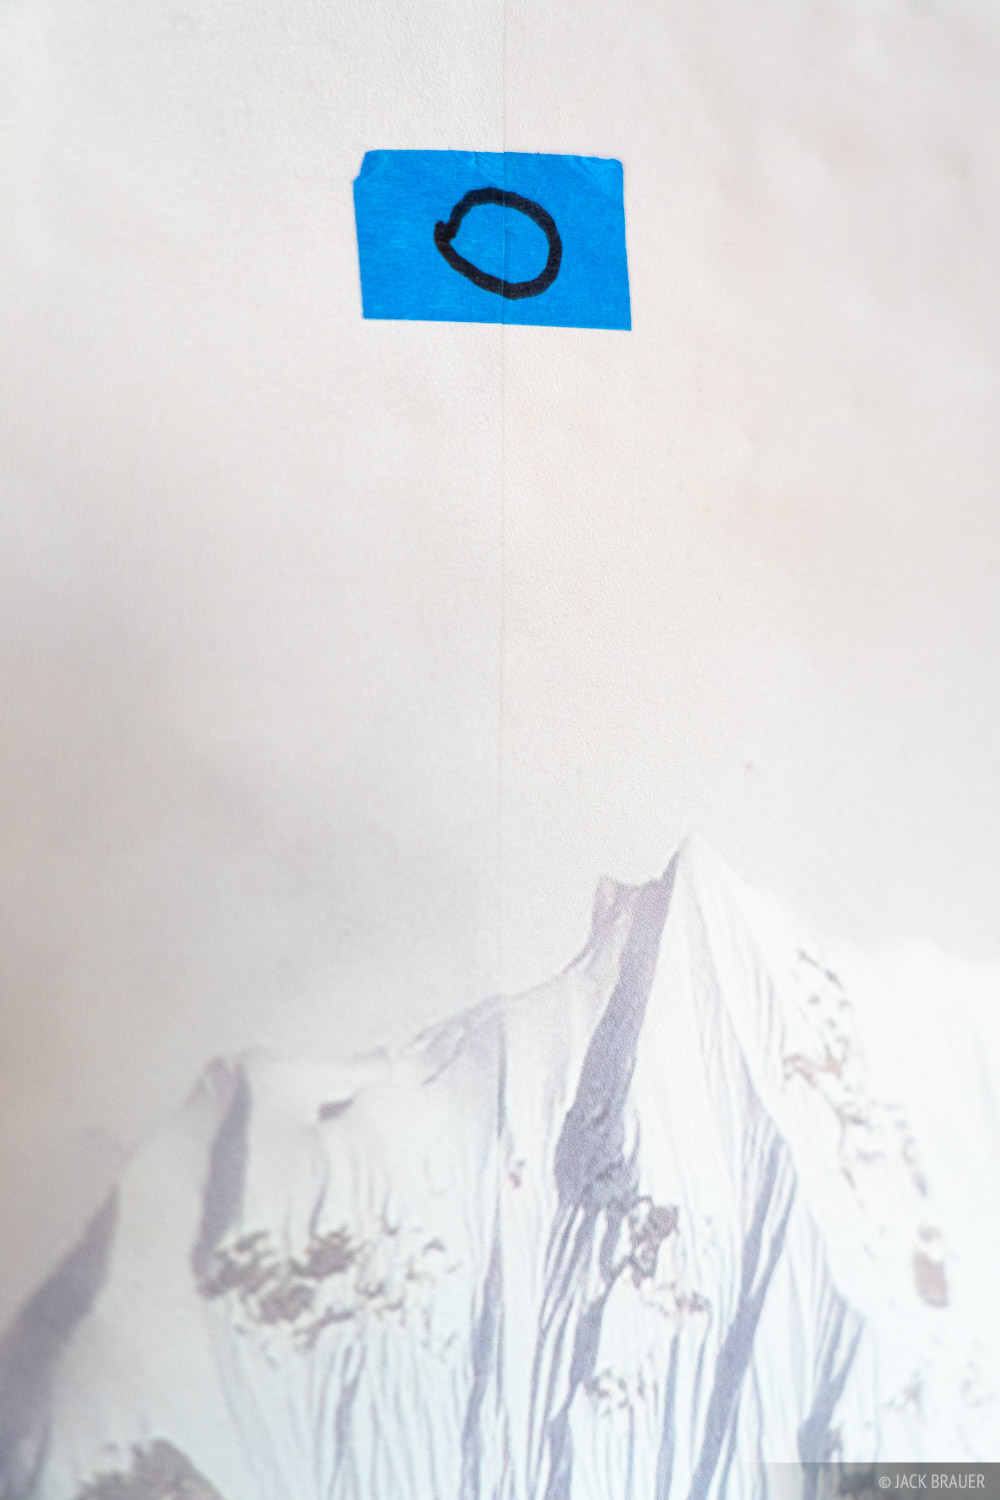
Where the mural panels overlap, the seam is hardly noticeable (it goes straight down the middle in this picture). The panels come with convenient marker tabs which make it easy to align each panel - just align the two halves of the circles.
Preparation: First clear the space around the wall so that you have a nice open area to work in. Ensure that any nails, pins, or hangers are removed from the wall. If there are any abnormal and sharp bumps on the wall, such as stray drywall spackle splatters, you can flatten those with a hammer or by lightly sanding them down a bit. Wipe the wall down with a damp, lint-free cloth to clean off any dust. Finally, if there are any electrical outlets on the wall, unscrew and remove the plate(s) - you'll screw them back on once the mural is installed.
Your mural will arrive rolled in a tube, so open up the tube, pull the mural out, and unroll it on the floor.
Given the large size of these murals, it's likely that your mural will consist of several separate panels. Each panel is printed with an overlap of about 1-2 inches when matched up with its neighboring panel, and each panels is marked with painters tape markers exactly where the images match up. So don't remove those markers until the mural installation is completed; they make it much easier to get the alignment just right!
The mural panels have an adhesive back, with a backing paper that you'll peel off during installation, just like a giant sticker. During the entire installation process you must be extremely careful to not let the mural get folded over and stuck onto itself! Therefore, do not peel off the backing paper yet. It's best to peel off the paper from top down as the mural is hung. This will make this process much easier.
As you consider your plan for installation, first determine which edge of the mural is most important to get perfectly aligned. For example, if the mural will be displayed on a wall with an outside corner, like in the picture above, that corner is the most important edge to get lined up just right, since a misalignment would be most noticeable there. You should plan on aligning the first mural panel starting on that most important edge first to ensure a perfect alignment there.
Installation: Once you're ready to start installing the mural, take the first panel and start peeling off the paper backing from the top edge. Peel off only about the top 12 inches and tear or cut off the backing paper there. Leave the rest of the backing paper on for now.
It's best to leave the backing paper on the mural panels during installation, removing it from the top down once the panel is properly aligned in its perfect position. This will allow you to more easily make positioning adjustments if need be.
Again, be super careful to never let the mural fold over and stick to itself! This will cause major hassle and potential damage to the mural when trying to pull it apart. This is why it's very helpful to leave the paper backing on and only peel it off slowly once the panel is already placed in the perfect position.
With only the top 12" or so of the paper backing peeled off, have one person on a stool holding the top corners in place, while the second person makes sure the panel is aligned correctly to the edge of the wall. When the panel is perfectly aligned, stick the top of the mural panel to the wall and rub it smooth against the wall with your hand, ensuring that it's flat with no folds or air bubbles. With the top of the panel now securely stuck on the wall, I'd recommend to leave the rest of the paper backing on for now, while you move on to the second panel. (This will allow you to more easily make alignment adjustments if needed later on).
Repeat this process with the second panel, ensuring that the image overlap alignment markers are perfectly aligned together for both the panels. Repeat again for the third, fourth, etc. panels as needed.
When all the panels are in place and everything is properly aligned, you can then go back and start carefully removing the backing paper in its entirety, from the top down. As you slowly peel the backing paper off, rub the mural against the wall with your hands ensuring that there are no folds, creases, or air bubbles. Repeat for all the following panels, always ensuring that the alignments are still correct as you go.
Once the panels are installed, if there is any excess material that runs longer than the wall, you can trim it off with a razor blade. It helps to have a long ruler or yardstick for this, to keep the razor cut straight.
If you covered an electric outlet, feel where the hole is and cut around the inside of the hole. Then screw the electric plate back on over the mural.
Don't worry too much if you accidentally bend or crease the mural panels during installation; once they are adhered to the wall, any bends will flatten out and will be unnoticeable.
Wall Mural FAQs
Honestly, how easy are these murals to install?
If you read the installation instructions above, you can tell that the installation process is certainly more complex and hands-on than simply hanging a print. That said, no special skills or tools are needed. Mural installation requires the teamwork of two people and a basic attention to detail in order to ensure that the panels are correctly aligned. If you follow the instructions above, installation is straightforward and easy.
As cautioned above, it is very important to leave the backing paper on until final placement is ready, so that you avoid accidentally getting the mural folded and stuck to itself during install! That is the one major pitfall to avoid.
Do you offer mural installation service?
I do offer mural installation service in Denver, Colorado and surrounding Front Range areas. The exact cost for this depends on the size and complexity of the wall area, but generally is very reasonable and worthwhile if you would prefer a hands-off, full service installation. Please contact me for an installation quote in the Denver/Front Range area.
Unfortunately I do not offer installation services outside the Denver area. If you are unsure of your ability to install a mural after reading the instructions above, or if your wall has other objects in the way that would require a more complex installation, I would recommend to contact a local wallpaper installer or perhaps a painting and decorating specialist. A wallpaper installer would be familiar with working with large sheets of wall coverings like this.
Does the wall have to be perfectly smooth?
The smoother the wall, the better; however, these wall murals can be installed on a normal moderately textured drywall surface just fine. Walls with rough, deep drywall texture or sharp bumps will not work well. The vinyl material is sturdy enough to smooth over normal drywall texture, though larger bumps will still be visible in the surface. Any wall texture that shows through on the surface will just look like the normal texture of the other walls nearby, and won't detract from the spectacular image quality.
If there are any sharper bumps on the wall (like little drywall spackle bumps) you can use a hammer to lightly pound those flatter before installing the mural. Use a piece of paper between the wall and hammer so that you don't mark up the wall. Sharp bumps or stray nails could potentially damage the mural.
When measuring the wall, do you need the exact measurements?
Yes, it is very important that you provide me with the exact measurements of the wall, to the exact fraction of an inch. The mural will then be slightly oversized by about 2 inches larger, to provide a bit of leeway in case the wall isn't perfectly square. Any excess mural material can be easily trimmed off with a razorblade and ruler once the mural is installed.
Is the mural installation permanent?
The mural has an adhesive backing that is like a reusable sticker. It does not leave any residue on the wall when removed. So while the mural install looks permanent and will stay on the wall for as long as you want, it is very easy to remove. The mural can even be removed and installed on a different wall if desired (though this would be a complex and typically not recommended procedure).
Can the mural be easily cleaned?
Yes! The mural is made of a durable vinyl material which can be easily cleaned with water or normal glass cleaner, and a soft rag.
Can any of your photos be used for a wall mural?
The giant size of these murals requires high resolution photos that can be printed at large sizes while retaining good details. Therefore some of my older, lower resolution photos won't be suitable for mural printing. A good place to start searching for a wall mural photo would be to search "Large prints" on my website. Or, feel free to contact me to ask if any particular photo would work well on a mural.