Originality in the Grand Landscape
This article was originally published at Photography Life in October 2012, but I still consider it to be the most comprehensive article I've written about my photographic methodology in the grand landscape genre. Nearly 9 years later, I have updated some of the technical info here and added a few more photos and text, but the bulk of the article remains the same and as valid and relevant as ever to my photography.
Originality in the Grand Landscape
by Jack Brauer
I am a mountain photographer. Mountains are my greatest passion; whether I’m hiking, camping, snowboarding, photographing, or just sitting there soaking in the view, mountains make me feel more alive and inspired than any other kind of landscape. For that reason I live in a small town in southwest Colorado, surrounded by the mighty San Juan Mountains, an endless sea of peaks that provide a lifetime’s worth of exploration and photography.

A dreamlike scene as storm clouds lift off the peaks and fresh snow glistens in the moonlight, while winter camping in the Mount Sneffels Wilderness in southwest Colorado. (Canon 5D Mark II, Canon 17mm TS-E)
When it comes to photographing mountains, I heavily favor the “grand landscapes” - those sweeping vistas full of rugged peaks as seen from high vantage points, preferably splashed in rich sunrise or sunset light. These big views are the reason I fell in love with mountains and perhaps the reason why most people venture up a mountain in the first place - to see the view!
I will admit, however, that it can be difficult for us photographers to be very creative when shooting big landscapes. After all, the grand landscape photo is mostly about the landscape itself, rather than a display of the photographer’s sheer creativity. Whereas a macro, close-up, or "intimate" shooter has a virtually blank canvas to paint with light, with an infinite palette of color, selective focus, and bokeh, the landscape photographer is more or less tied to the reality of the scene and the whims of the weather and light. My goal of this article is to explain how photographing the grand landscapes can still be a very creatively fulfilling pursuit, and not just from behind the camera!

Moonlit mountains and the last colors of sunset, as seen from the summit of Mt. Elbert, the tallest mountain in Colorado at 14,440 feet. I spent three hours on the snowy summit on this calm February winter night, in awe of our planet, before I made my way down under the moonlight. (Tachihara 4x5 wood field camera, Provia film, 8-minute exposure)
Location, location, location
Obviously, when photographing a grand landscape, the single most important thing is the landscape itself! The place. The location.
In terms of creativity, here’s where I think many photographers shoot themselves in the foot from the start. They swarm to the same iconic spots, over and over and over again. Delicate Arch. Maroon Bells. Oxbow Bend. Yes, these places are iconic for a reason - they are spectacular! But, the problem is that in this day and age we’ve all seen these images thousands of times before. In most cases, the best a photographer can hope for in these iconic locations is getting something “as good” as what they’ve already seen before, or maybe just a little bit better if the weather and light conditions are truly phenomenal. But usually, the photos are already stale before the shutter is even pressed, like a cover band playing "Freebird" for the bazillionth time.
If you enjoy the camaraderie of your fellow photographers and strive to tick the checklist of all the popular iconic views, then perhaps this can be a fun enough pursuit. But if you’re more interested in getting your creative juices flowing, I would suggest straying from the beaten path. Whether it means taking a short side path through the bushes away from the established viewpoints, or trekking for days into the wilderness to get away from it all, finding your own spot is the first step in the creative landscape photography process.
For me, this is a huge part of the process and most of the fun of it all. I am fortunate to have the time and health to go on long backpacking treks in the mountains, and indeed this is what I enjoy doing, as much or even more than taking photos. I loved backpacking before I even owned a camera, and I still love it. Photography just adds another dimension and motivation to the experience. The bonus for the hiking photographer is that they can get to their own locations - places that haven’t been photographed to death, places where he or she can see landscapes with fresh eyes and can choose compositions that haven’t been chosen before.

Here is a shot of the famous Grand Teton in Wyoming, reflected in a remote alpine lake on the west side of the mountain. We’ve all seen the classic views of the Tetons from the Jackson Hole valley - they are indeed spectacular. But I prefer the experiences and challenges of hiking into the range to discover lesser known vistas like this. (Tachihara 4x5 wood field camera, Nikkor 135mm, GND grad, Provia film, drum scanned and converted to b/w in Photoshop)
The initial creative spark of much of my landscape photography happens before I even put my backpack on. I spend a lot of time researching new routes and remembering past hikes and views, all the while trying to envision potential scenes in potential light. There are some very powerful tools and strategies I use for this:
CalTopo
CalTopo mapping software is my primary tool for planning hikes and backpack trips, featuring a variety of map layers including USGS topo maps, Forest Service maps, MapBuilder Hybrid topos, satellite imagery, and more. Using CalTopo I can plan out my routes and it will automatically calculate the mileage and elevation gains. I can print out the map sections I need for my trip, or I can save my routes to the CalTopo app on my phone to help navigate in the field. With all the maps I could possibly need at my fingertips on my computer, I don’t need to rely on guidebooks anymore for trip ideas - I just open the topo maps and pick my own routes. CalTopo is free to use, but a modest membership fee unlocks bonus features including up-to-date satellite imagery which is helpful for example for seeing how much snow is left in the mountains in the early summer.
The Photographer's Ephemeris (TPE)
The Photographer’s Ephemeris (TPE) is a fantastic tool for planning potential light conditions and photo ideas. This application, built by photographer Stephen Trainor, shows maps or satellite imagery with an overlay of where and when the sun and moon will rise and set. This is invaluable knowledge for planning grand landscape shots. Will the sunrise shine directly into this mountain valley, or will it be blocked by a high ridgeline? Will the moon set behind this peak, or somewhere off to the side out of view? TPE makes it easy to figure out. I use the desktop website version of TPE in conjunction with CalTopo and Google Earth when I'm planning my routes to come up with potential landscape photo opportunities for each sunrise and sunset along the way (and maybe moonrises and moonsets too).

Solar eclipse over the Sneffels Range, Colorado, May 2012. I used TPE to determine that I’d be able to view the eclipse positioned above Mt. Sneffels if I climbed up 13,139 ft. Hayden Peak. That much was planned, but while I was shooting I was surprised and thrilled to see that the eclipse was clearly visible as multi-colored refractions in the lens flare! Normally I go to great pains to minimize or eliminate all lens flare, but this time I quickly experimented with different focal lengths, angles, apertures, and shutter speeds in order to fully maximize the lens flare and the eclipse refractions. (Canon 5D Mark II, Canon 70-200mm @ 91mm)
Google Earth
Google Earth is just plain fun. Who doesn’t like flying around the globe seeing all the 3D topography from a bird’s eye perspective? But it’s also a powerful tool for planning grand landscape shots. Before Google Earth, I’d just have to study a map carefully and try to imagine the topography as it would be seen from a certain point. Google Earth does this for me, and does it well! Say, for example, that I know I want to shoot from a certain high ridgeline. Normally I’d hike up to that ridgeline and then I’d have to hike around back and forth, perhaps over a number of peaks, just to scout out the best spot to shoot from. I might even have to do this the day before to find my spot, then return again the next morning.
With Google Earth, I can do this before I even leave my house! By virtually flying around in Google Earth, I can find that perfect vantage point on a big ridgeline, mark it on the map, and then I can hike to that spot in the dark, knowing precisely where I want to be for sunrise.
Google Earth can also be helpful for scouting off-trail bushwhack routes. Occasionally I’ll print out a screenshot overview of the terrain from Google Earth, which is sometimes much more helpful than an actual map, since I can “see” the terrain and vegetation as reference while hiking.

Snowy clouds lifted just in time to reveal Ama Dablam bathed in alpenglow light, in the Khumbu/Everest region of the Himalaya in Nepal. By scouting out potential photo locations on Google Earth prior to this trip, I was able to find this remarkable, unique vantage point which I've never seen photographed before despite being along the most popular trek in the world. Of course it also took a hell of a lot of effort just to make it to this high-altitude lake, along with a heaping portion of luck to score such a perfect conditions and a fleeting weather window. (Sony A7R, Contax/Zeiss 35-70mm)
PhotoPills
PhotoPills is a useful app to use in the field for visualizing where the Sun, Moon, and Milky Way will be in the sky, using a visual overlay over your phone's camera view. You can point your phone at the scene and see the paths of the sun and moon and exactly where and when they will rise and set on the horizon or behind a tall mountain, or you can see how the Milky Way moves through the night sky. I use PhotoPills oftentimes during the final stage of planning while I'm out in the mountains to hone in on the exact spot to be if/when I'm trying to catch a moonrise or sunset, for example.
PhotoPills is especially helpful when shooting with a telephoto lens, since a slight change in your position can dramatically change where the sun or moon is in the camera frame.
PhotoPills and TPE both have many of these overlapping features, so you may be able to use just one or the other, or both depending on your preference!

The crescent moon sets behind Uncompahgre Peak (14,309 ft.) in the San Juan Mountains of Colorado. I was shooting with a telephoto lens from a high ridge miles away and used PhotoPills to figure out the exact location I needed to be to capture the peak directly between the setting moon and Mercury. (Sony A7Riv, Tamron 70-300mm @ 450mm equivalent in APS-C crop mode).
Good Old Fashioned Exploration
While these websites and apps offer powerful technological advantages for scouting potential landscape photos, they have their limits. You can only imagine so much from looking at maps, and many beautiful scenes are missed or poorly rendered in Google Earth. Nothing will ever replace simply getting out there on your own two feet and exploring new places. On nearly every new hike or backpack trek I do, I inevitably find unforeseen scenes to photograph, whether right then or to remember for future occasions. So don't get discouraged if you can't think of a photo idea through research alone - just get out there and go see what you can find!

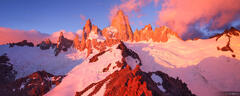
Sunrise light on Monte Fitz Roy, Argentina. This is an extreme example of a unique vantage point I found through exploration alone. Without any beta or prior research, while doing some scouting hikes in Patagonia I scoped out a possible route up to this viewpoint and climbed up here the next day. The view was astonishing and I dreamed of possibly returning someday for sunrise. Four years later I returned to Patagonia and did it! I wrote more about this memorable experience here. (Canon 5D Mark II, Canon 24mm TS-E)
Using the apps mentioned above, along with weather forecasts and a reservoir of experiential knowledge from past trips (depending on where I am), I am not only able to discover new landscape perspectives to photograph, but I’m also able to increase my chances of being there in the right place at the right time. If I’m going on a multiday trek, I’ll use these tools to plan out a potential landscape photo or two for each morning and evening of the trek. Sometimes the weather and light align perfectly and I actually get the shots that I imagined; other times the light is disappointing and the photos don't work out, or oftentimes I find something totally different and unexpected. In any case, having some pre-visualized photo ideas in mind will greatly increase your odds for successful grand landscape photos, especially for more ambitious ideas that would require lots of logistical preparation and effort to achieve.
The Hollow Pursuit of Tripod Holes
What I do not recommend doing is to see a striking photo and say to yourself “I want to go THERE!”. Some photographers do this. Hell, I even catch myself with this impulse from time to time. We see a photo that inspires us and we’ll figure out where it was taken and we’ll hike for hours or days to basically reshoot the scene. That kind of motivation is no different than the icon shooting that I mentioned before - except it’s just harder to get there!
No, what I’m talking about here is finding your own locations. It doesn’t have to be a place that nobody’s ever been to before; after all the entire planet is more or less thoroughly explored and photographed by now. When I mean is to do your own research, come up with your own ideas, and then pursue those ideas. This is part of the creative process!
By following in other’s footsteps and trying to copy other images that you’ve seen, you’re shortchanging yourself of the initial creative spark. In fact, in that case the creative spark is not yours at all - you’re simply executing someone else’s original creative vision! Sure, you can make your own variation on the composition and maybe you’ll get lucky with even better weather conditions, but the end result will always be less gratifying than a photo that you conceived and created on your own from start to finish.
This is what I strive to do with my photography, and what I enjoy doing the most. Are all my photos totally original location ideas? No, of course not. But a large portion of them are (at least as far as I know), and those are the photos that mean the most to me.

Cimarron Sunset Panorama, San Juan Mountains, Colorado. This was taken from an outcropping that I had scoped out from afar during a hike up a nearby mountain early in the summer. When I finally made the bushwhack hike up to this point in the autumn, I was delighted by the great view and the even better sunset! (Canon 5D Mark II, 24mm TS-E. This is a stitched panorama of four images – and each of those four images were a combination of 2-3 exposures each for exposure range, blended manually in Photoshop before the final stitch in AutopanoPro).
It can be argued that if the originality of a landscape photo is based simply on finding an original location, then it’s not truly creative since anybody could simply go find that same location and potentially take a similar or better photo. While that is true to some degree, again I think it goes back to the intentions and motivations of the photographer. This is the personal aspect of creativity, and many times only the photographer him/herself will know if his or her photo was truly born out of an original creative idea. Nobody else knows, or cares. But, I believe that over time, the collection of an original creative photographer will speak for itself.
Regardless of these judgements of originality and creativity, the point is that by finding unique, original landscape perspectives to photograph, it is much more enjoyable and much easier to get the creative juices flowing. It’s easier to create your own landscape interpretations when you are seeing a place with fresh eyes, without previous photographers’ images cluttering up your head and influencing your motivations.

Sultan Mountain, high above Silverton, Colorado. After waiting in our tents in an autumn storm, a photographer friend and I hiked up to this high ridge to watch the breaking storm clouds lift off the peaks. The combination of repeating ridgelines - accentuated by the compressed view of a longer lens - misty clouds, and natural complimentary colors made for a striking photo. (Tachihara 4x5 wood field camera, Nikkor 200mm, Provia film)
Although hiking and backpacking is my preferred method for finding unique locations, it’s not always a necessity. For example, here in the San Juan Mountains where I live, there are also a lot of 4x4 dirt roads - a vast network of old mining roads that go way up into the mountains as far as 13,000 feet. These offer plenty of opportunities for non-iconic grand landscape shots, especially for those who are willing to wait while storms pass, so that they can be up high to shoot the dramatic weather. Or for another example, in another place perhaps a canoe or kayak could get you to some lesser seen river canyons or ocean beaches. Even at iconic locations, chances are you can wander away and find your own unique perspective on the scene.

Sunset light illuminates Eiger and Mönch - Switzerland. By taking a half hour stroll from the crowded Kleine Scheidegg cogway station, I was able to find a small reflection pond for a fresh perspective of some of the most legendary mountains in the world. (Sony A7RIII, Sony 24-105mm @ 24mm)
The basic idea here is to get off the beaten path, to come up with your own ideas to find unique locations to photograph. Instead of searching other photographers’ portfolios for photo location inspiration, search a map and use your imagination. This is a big part of the creative fun of shooting grand scenics!
That Special Something
The next step is to seek that “special something”. Any striking landscape photo needs to have something special going on - something out of the ordinary. A good cloudy sunrise or sunset is the standard sure bet (if the weather cooperates). A splash of sunlight beaming through the clouds or trees. Foggy mist swirling about the peaks. A perfect reflection that adds symmetry to the composition. Things like this add that extra spice to an image and set it apart from a regular snapshot. They elevate a scene into more than just a static landscape but a unique slice of time - an event in nature.

Trollveggen, Norway. This photo is all about the misty clouds streaming off the peak, which happens to be the tallest vertical wall in all of Europe. The light isn’t remarkable, and without those clouds the photo would be fairly mediocre. But the swirling clouds add a fascinating dynamic that turns the scene into more than just a landscape image - it’s a moment in time. (Olympus E620, Olympus 7-14mm lens @ 7mm)
There are two main ways to increase the chances of finding special weather and light conditions. The first is to shoot when the light is good! And the most sure-fire way to do this is to get up and be there for sunrise and/or sunset. Not only that but be there a half hour or more before sunrise and after sunset. Sometimes the best light for certain landscapes is that soft purple dawn glow which illuminates entire landscapes and reveals the topography better than direct light can. This often involves hiking and waiting in the dark, so be sure to have warm clothes and a bright headlamp with you. I oftentimes wait in one place for hours for the best light; but this is never boring for me. I value this time to relax and soak in the view.
The second way is to go out in unstable weather, when you’d probably usually rather not go outside. When the weather forecasts call for a week of pure sunny weather, unlike most “normal” human beings I usually lose motivation to go backpacking and I just stay at home. Why? Because cloudy stormy weather makes for dynamic photographs and great sunrises and sunsets.
That said, clear weather offers unique opportunities too, particularly for night shooting. What’s the moon doing? Did you know that a rising or setting moon will cast the same kind of red alpenglow that sunrise or sunset does? It’s not visible to the naked eye, but it is certainly visible to a high-ISO camera sensor with a long exposure. Or perhaps there’s just a sliver of moon and you can capture the stars and Milky Way over the mountains? Just moonlight or stars on their own won’t always provide that special touch, but they are ingredients that can help push a photo in that direction.

The most iconic mountain of all, the famous Matterhorn in Switzerland. Here is an example of a mountain that makes me want to say - ignore everything I just said about not shooting icons! The mountain might be the most photogenic in the world, and it pulls ALL photographers to it like a magnet. In this photo I was fortunate to catch three extraordinary elements together to create a more unique take on the oft-photographed peak: fresh snowfall, breaking storm clouds swirling about the peak during a long exposure, and full moon light illuminating the night scene. This photo probably also breaks some fundamental photographic rules by having the peak smack in the center of the frame, but I wouldn’t want it any other way. The peak demands to be front and center. (Canon 5D Mark II, Canon 70-200mm @ 100mm)
In any given landscape, it’s important to seek out those special moments of light and weather, and somehow incorporate that into your photo. Remember that photographs of a big landscape are never as impressive as being there in person. You can stand on the edge of the Grand Canyon in the middle of the day and be totally awed by the scene, but that awe will not transfer over to the two-dimensional photograph unless the light or something about the atmosphere is special.
Creative Composition

Wetterhorn Peak in Colorado is one of my favorite mountains; I've photographed the peak from every angle over the years and this is its best profile in my opinion. I remember this particular vantage point was my first Google Earth "discovery" back in 2007 just a few years after it was launched to the public. The scene looked striking enough in Google Earth but when I hiked up to this ridge during a backpack trek I was still blown away by the grandeur of the mountain from this angle.
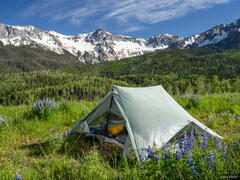
I took this photo on a subsequent 5-day trek around this peak. My wife and I hiked up to this high ridgeline for sunset, but I took this photo after sunset, when the moon was rising and the alpenglow illuminated the peak with an even, warm light. Some people have remarked that "it's too bad" the flowers are facing away, but I actually like it that way in this image. It's like they are the audience of the scene, admiring the mountain and the moonlight. The attention is not focused towards the viewer, but rather towards the mountain itself.
This was shot with a Canon 5D Mark II with a 24mm tilt/shift lens, in relatively low light: 4 seconds at f/20 and ISO 1600. By using the lens's full tilt, I was able to keep the extreme close up flowers and the peak both in focus in one shot (something that would require numerous exposures and an impossible mess of focus blending with a regular lens). Because I was at the limit of the lens's tilt focus ability, I also stopped way down to f/20 to further increase the depth of field. A high ISO (the sensitivity of the sensor) enabled a relatively quick 4-second exposure to increase my odds of getting those flowers sharp between gusts of wind.
Framing the photo is without doubt the most hands-on, actively creative part of photography.
Shooting grand landscapes is a somewhat traditional affair, and by that I mean that it is difficult to get wildly creative; afterall, the subject is the landscape in front of you and you have to take what is given to you - you don’t have full control over the possibilities. That said, you still have an immense amount of control over how you choose to present the landscape.
Choosing the foreground is perhaps the most creatively important aspect of framing the grand landscape, and can have a profound effect on the image. I do think it’s important to have a solid foreground, when appropriate, in order to give the viewer a place to “stand” in the scene. A close foreground gives a better context of spacial reality and scale of the scene, and it makes it easier for people to imagine being there in person.
I rarely shoot with my tripod fully extended; when the camera is closer to the ground I can get much bolder lines and compositions, and objects in the foreground are bigger and more dynamic looking. Also, with the camera down low, I can move just a few feet or inches to dramatically change the composition. Using this technique, I can hone in on a foreground composition that compliments the subject.

Some photographers really go nuts with foreground, with compositions where the foreground utterly dominates the scene. Ideally these foregrounds will have strong leading lines that direct attention to the subject in the background. When done right, this can lead to very dynamic compositions; when done wrong it can actually block the viewer from the scene, distract from the subject, or just look plain gimmicky.
Typically when I shoot mountain landscapes, my priority is to frame the shot in a way that centers the attention on the subject itself (usually a mountain peak). The foreground is supplemental and only used when it compliments the subject and grounds the scene. Therefore, in many of my photos, the mountain is big and the foreground is just enough to ground the scene and lead the viewer into it.

Sunrise reflection of Pyramid Peak, Glacier National Park, Montana. Here’s an example of a most minimal foreground. The underwater rocks are very subtle, yet just enough to ground the scene. The reeds at bottom right give just a touch of spacial reality - they break up the mirrored symmetry just enough to bring the scene back to a relatable reality. (Canon 5DII, 24mm TS-E, with lens shifted up and down for a seamless stitch of two horizontal frames)
As for compositional rules, I say forget about them. I’ve never felt the need to formerly learn them myself, and in my opinion they only serve to clutter your brain and make it harder to think clearly while shooting. I think it’s better to trust your instincts and frame the composition in a way that simply looks pleasing too you. One simple exercise that I use when framing a composition is to think of it as a print already on the wall. If that image was a print on my wall, seeing it day in and day out, what would I change to make it more pleasing, more interesting, more balanced? If you can think in terms of a finished print before you even take the photo, it will help you hone in on better compositions in the field.
I also think it is good practice to try to choose the exact composition before setting up the tripod. This is something I learned when I used to shoot a large format 4x5 field camera (the old-fashioned wooden camera with the accordion bellows, dark cloth, and ground glass focusing). That camera was so difficult to set up and manually focus that once it was set up, it might take another five minutes to move positions and refocus. This forced me to learn how to compose my shots first, using just my eyes, before setting up the camera. With digital it’s tempting to just immediately set up the camera and keep moving it around and taking shots while gradually honing in on the best composition. But, it is faster and more effective to try to learn how to chose the composition first. That way you won’t have to mess around with adjusting the tripod so much and you’ll be able to take less photos, with a higher keeper rate.
It would be funny to see myself doing this composition hunting - walking around, bending up and down, bobbing my head around like some kind of voodoo dance until I find the right spot and height to set up the camera. If you walk around, do the dance, and get on your hands and knees and snoop around the scene like a hound dog, you’ll find more interesting and creative compositions than if you just show up and set up the tripod in the first spot you come to. You’ll find things that you might miss on first glance.

Here's an example of a grand landscape photo where the foreground itself is the main subject - in this case a field of Indian Paintbrush wildflowers in Colorado. I used a wideangle lens placed at ground level right up close to the flowers and shot a panoramic view to convey an immersive feeling of being completely surrounded amongst the glorious wildflowers. The rising sun provided vibrant backlighting and rich color. This multi-frame panoramic stitch would not have been possible to create without a tilt-shift lens, since focus-stacking would have been impossible to do in the brief moment that the sun was shining below the clouds. Also it's worth mentioning that when shooting in wildflower meadows like this I am always extremely cautious to tread lightly and not trample the vegetation. (Sony A7R, Canon 17mm TS-E, stitched panorama).

Lago Sorapiss - Dolomites, Italy. With clear skies and no decent foreground that I could find, I was a bit stumped as to how to photograph this scene until I found these backlit larch trees to frame around the mountain. The foreground framing adds a lot of bold autumn color and visual interest to the otherwise empty sky while funneling the eye to the peak in the background. (Sony A7RIII, Venus Optics Laowa 15mm)
Wrap it up!
If you’ve made it this far, I thank you for reading and I hope that perhaps some of my words and photos here have inspired you to think creatively about shooting original “grand landscapes”. To boil it down to the essence, creativity with grand scenic photography goes beyond just framing and taking the photos; it involves the entire process including researching unique locations, coming up with original ideas to shoot, and the adventures to get to the right place at the right time.

Uncompahgre Sunset, Colorado. Despite everything I’ve said in this article, here’s an example of a totally unplanned spontaneous photo - just dumb luck of being in the right place at the right time. If you get out enough, even this will happen quite often! (Canon 5D Mark II, Contax-Zeiss 35-70mm)